At the Kitsu Submit, Axel Tillement, CG Supervisor at Cube Creative, took the stage to answer a simple question: how do you produce a large number of assets across very different projects while keeping your pipeline as stable as possible? His answer, grounded in years of production experience, offers a practical roadmap for any animation studio looking to scale without chaos.

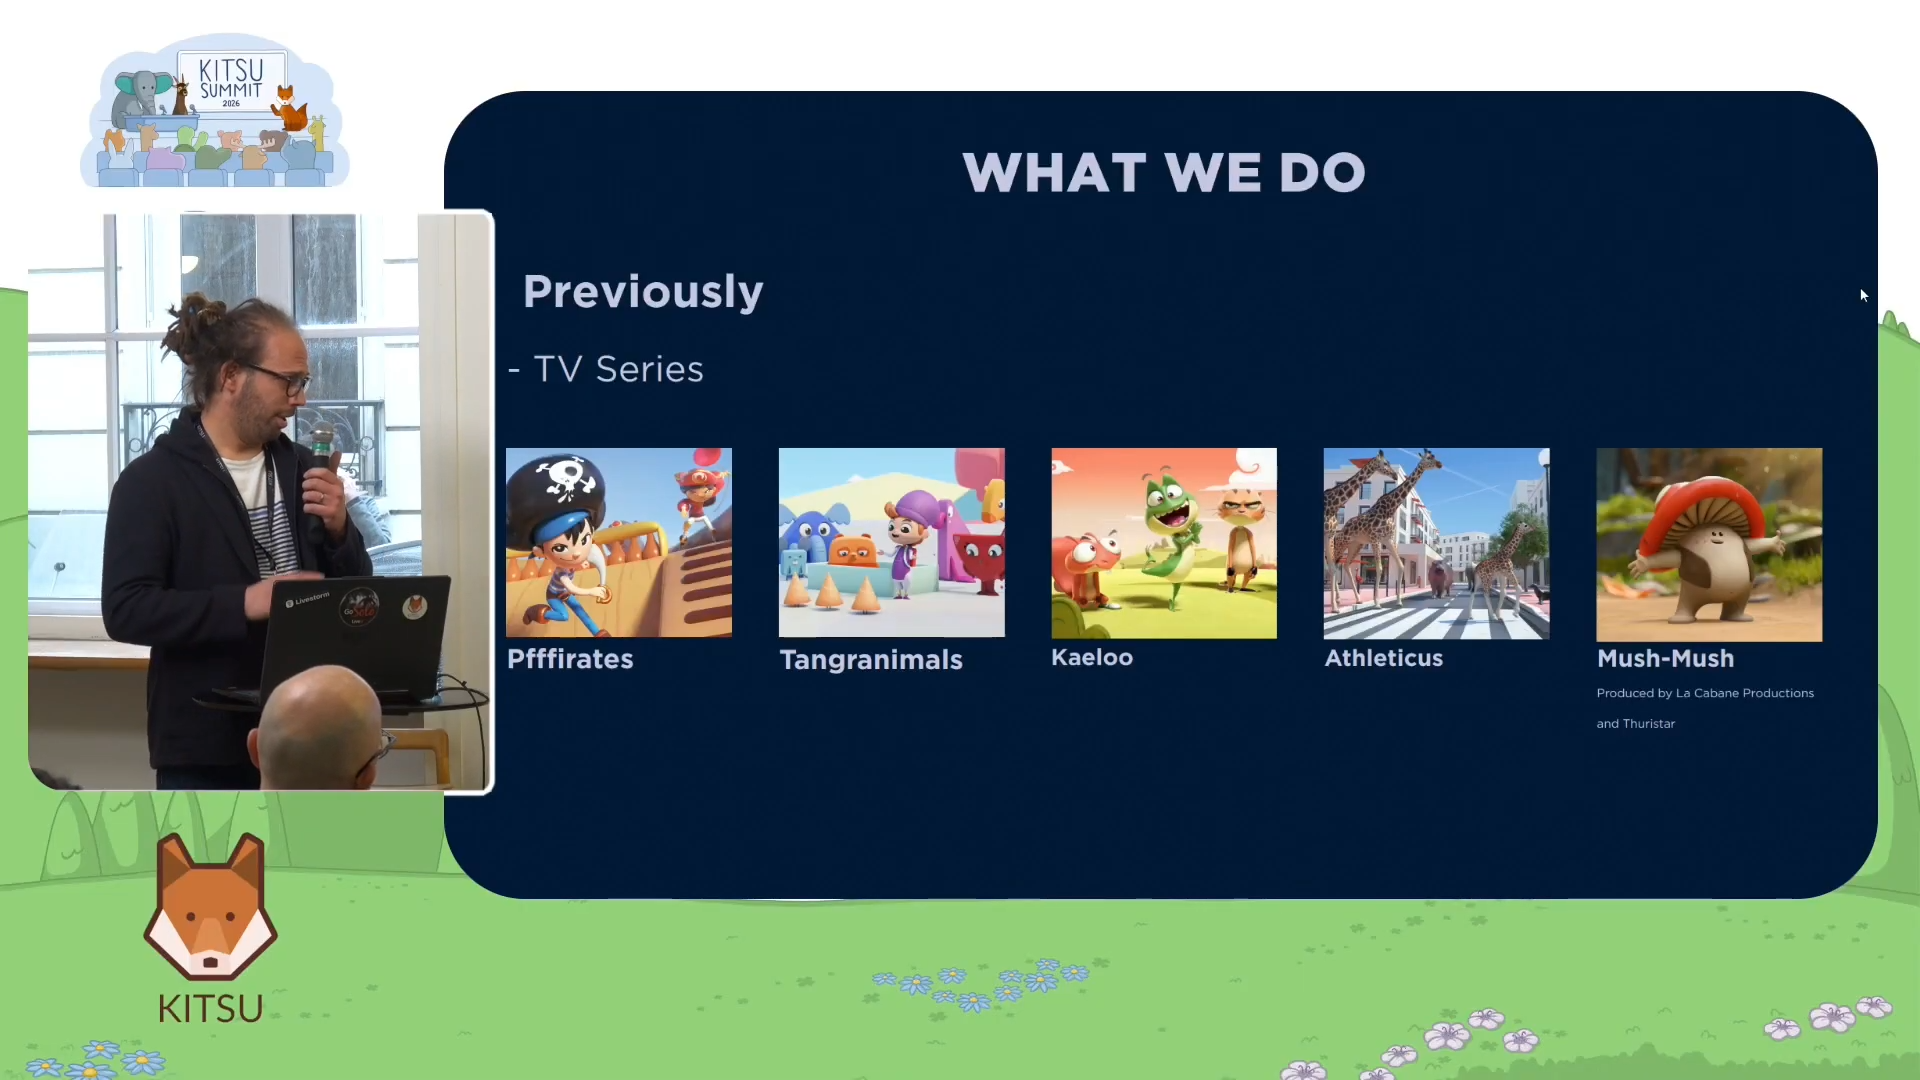
Cube Creative is a Paris-based animation studio with a track record of series produced both on commission and from their own IP. Recent work includes "Tangranimo" for France Televisions, "Pfffirates" for TF1, and "7 Bears," co-produced with Folivari for Netflix. These projects span wildly different creative demands: one features many characters, another adds dense vegetation, and the third layers in a fur rendering challenge on top of everything else.
What makes Cube's experience worth studying is not the ambition of those individual projects, but the fact that all three ran through the same pipeline. That pipeline did not stay static either. Each production actively fed the next one.
"Each project added its own contribution to the pipeline, with each project building on the previous one," Axel explained. "We're not starting from scratch on every project. Each project feeds into the next to make it easier."
The Two Pillars: Blender and Kitsu
Cube's pipeline rests on two tools. Blender handles the creative and technical production work. Kitsu, the open-source production tracker developed by CGWire, serves as what Axel calls the project's "collective memory."
For studios unfamiliar with Kitsu: it is a web-based production management tool that tracks the status of every asset and shot throughout a production. Artists and supervisors use it to know whether an asset is in modeling, awaiting validation, or ready to be used downstream. At Cube, Kitsu is the authoritative source of truth for where any given asset stands at any given moment.
"Kitsu is the project's collective memory," Axel said. "It knows the status of every asset, every shot, and the overall state of production."
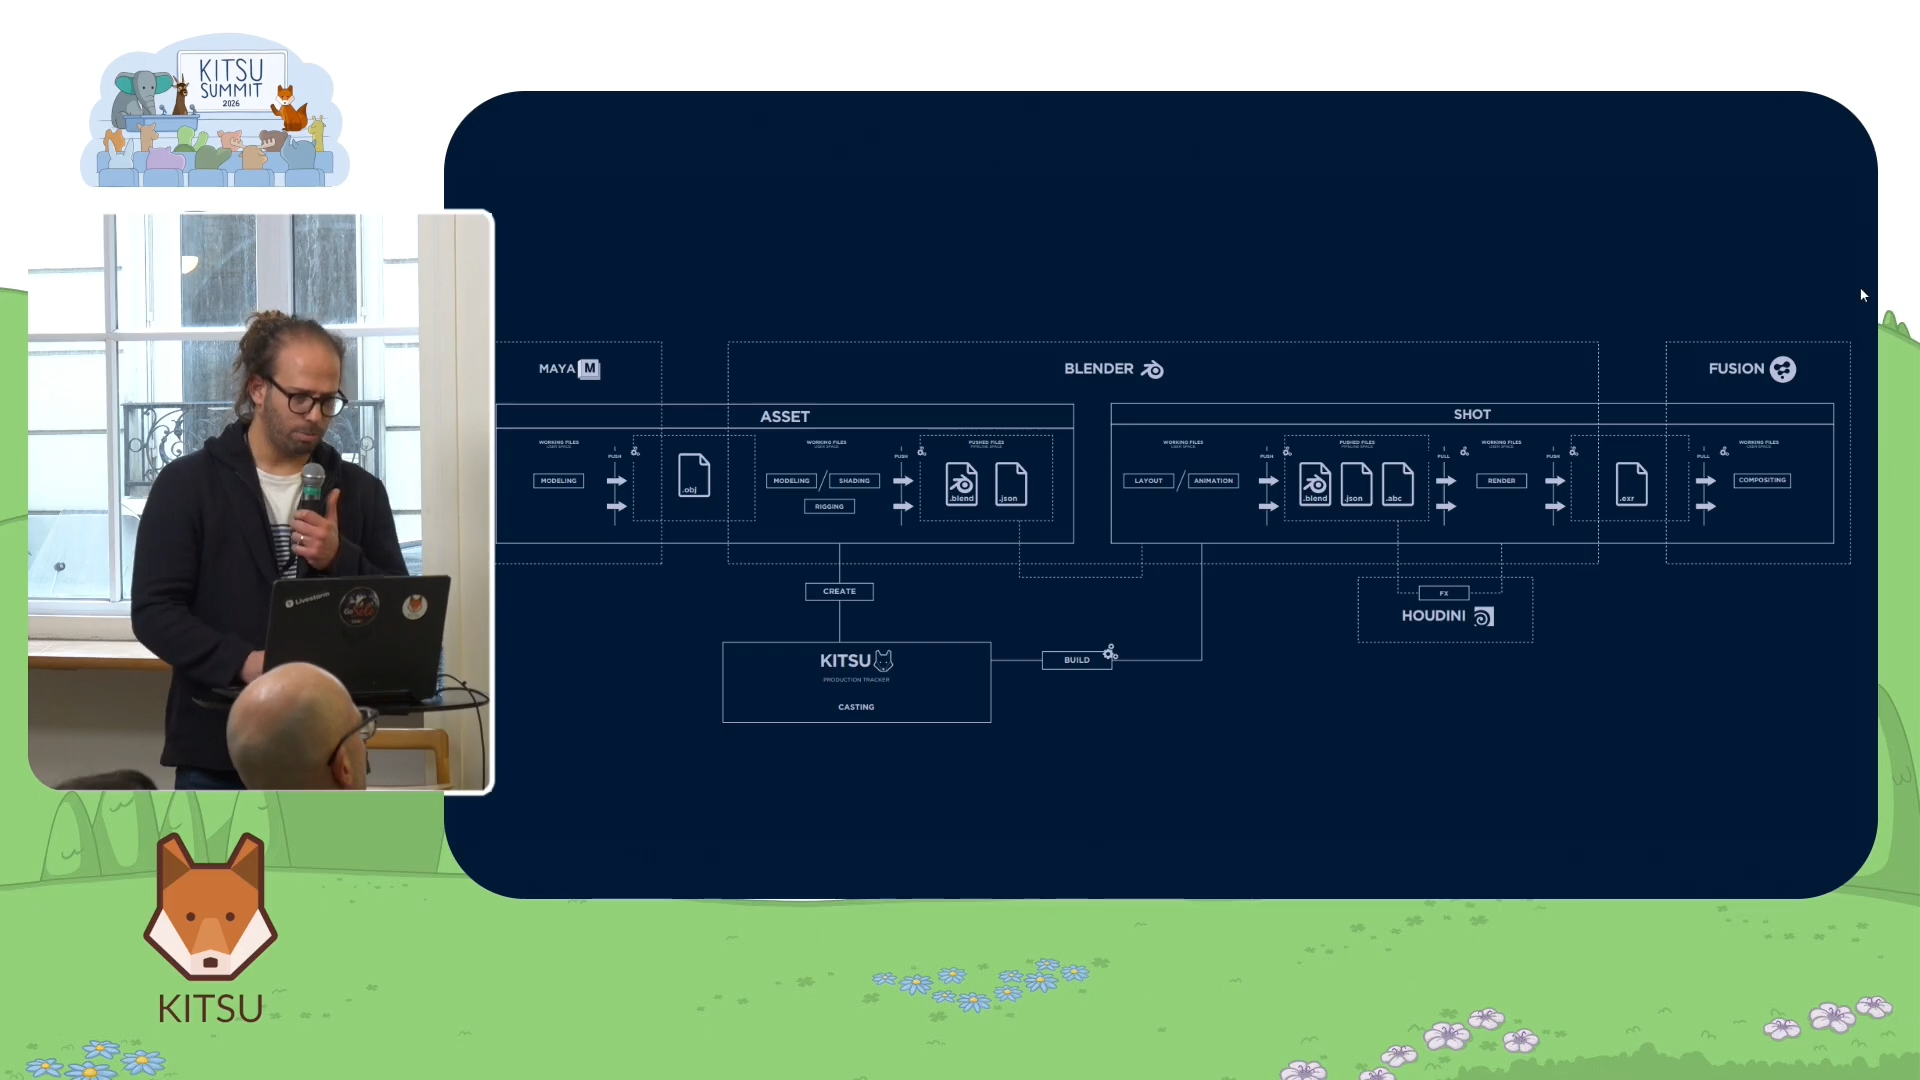
The pipeline does include other tools. Maya occasionally handles car modeling. Houdini still appears for VFX work, though Cube increasingly replaces it with Blender's Geometry Nodes. Fusion handles compositing output. But Blender and Kitsu form the core entry point, and every other tool feeds into them rather than operating separately.
A Tale of Two Spaces
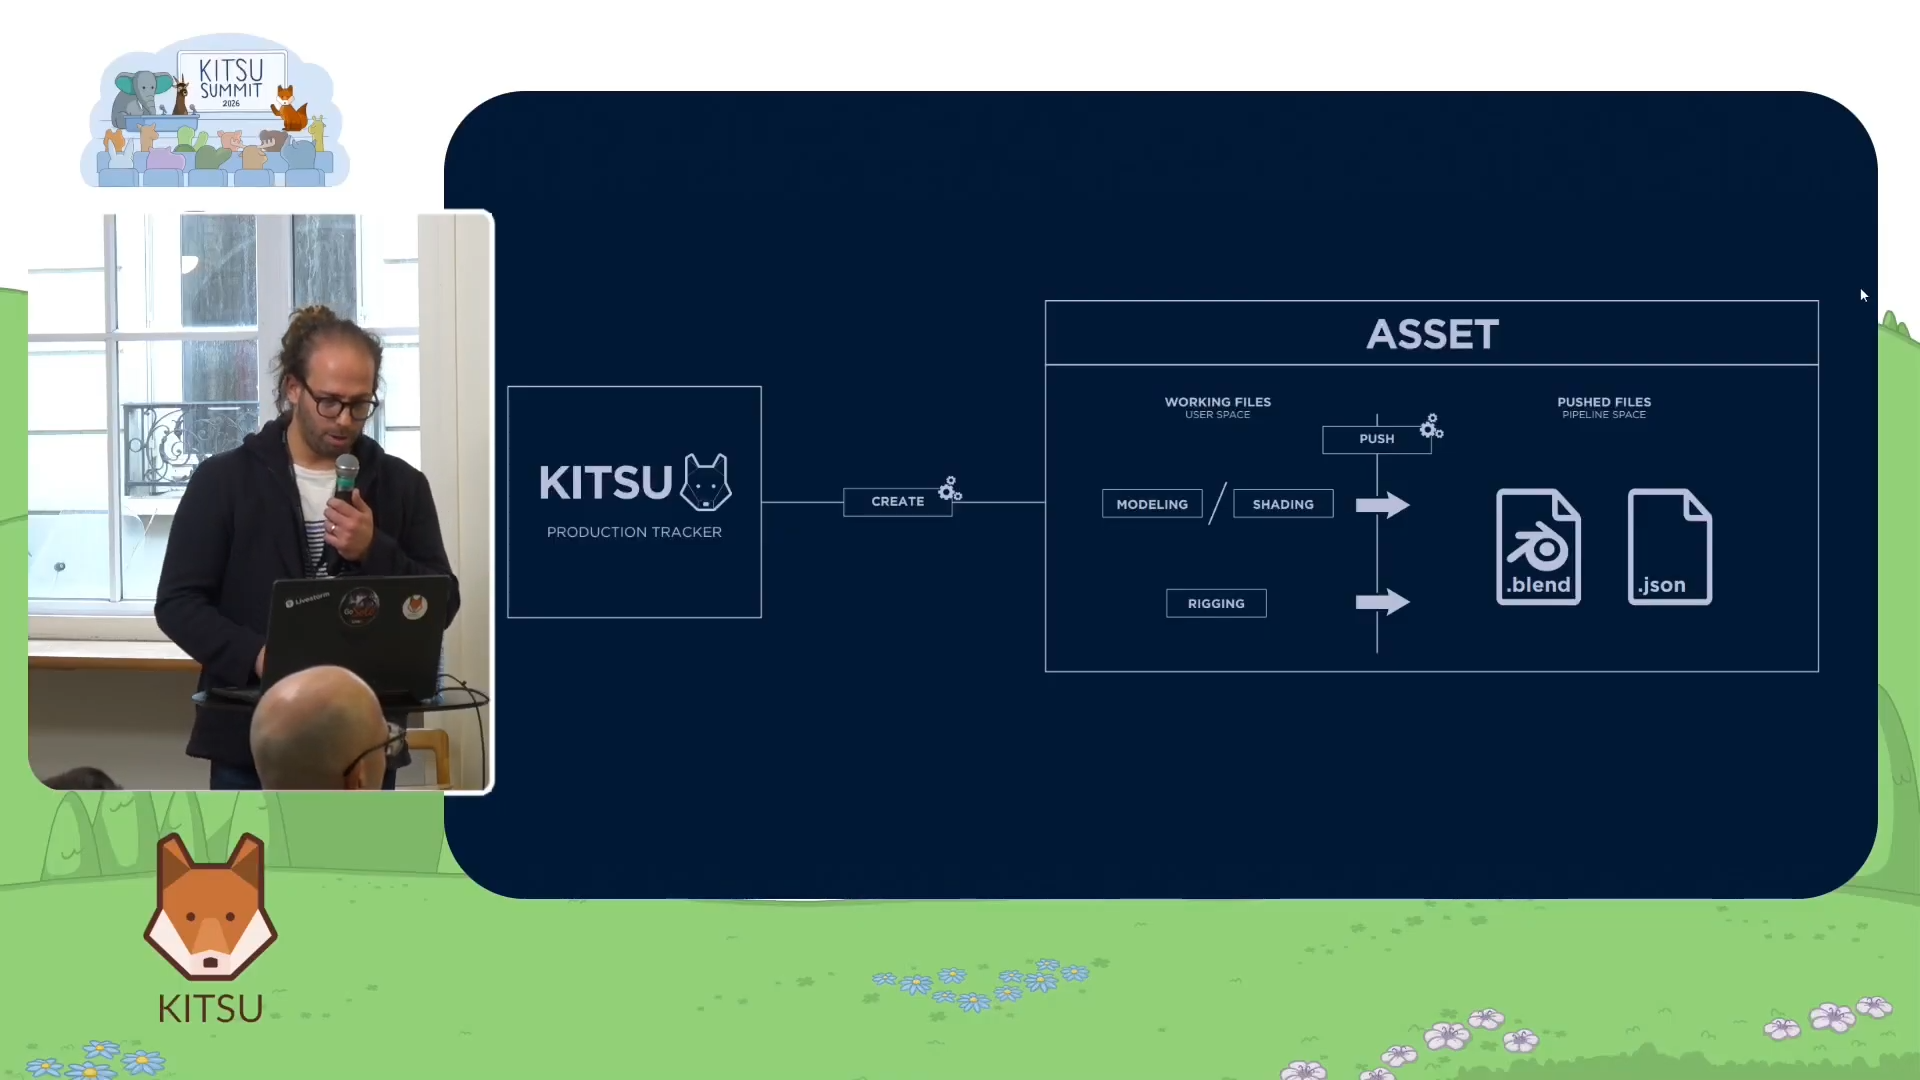
Once Kitsu creates an asset, Cube's pipeline splits into two distinct working areas.
The first is the user space, where all the production steps and incremental versions live. This is where artists do their daily work, and it connects directly to Kitsu. Kitsu tracks whether a set is validated, in review, or pending approval. Every status change that matters to production happens here.
The second is the push space. This is where assets are made available to downstream steps, even before they are fully validated. As Axel put it, assets in the push space are "healthy enough to move on to the next stages and be updated later without being destructive." Importantly, this space does not communicate with Kitsu. It is a separate, practical layer designed for continuity rather than formal tracking.
Alongside the Blender files in the push space, Cube also pushes JSON descriptor files. These contain metadata like mesh names, vertex counts, and subdivision instructions, essentially a machine-readable description of what lives inside each Blender file.
The Level of Detail System: Going Back to Production Basics
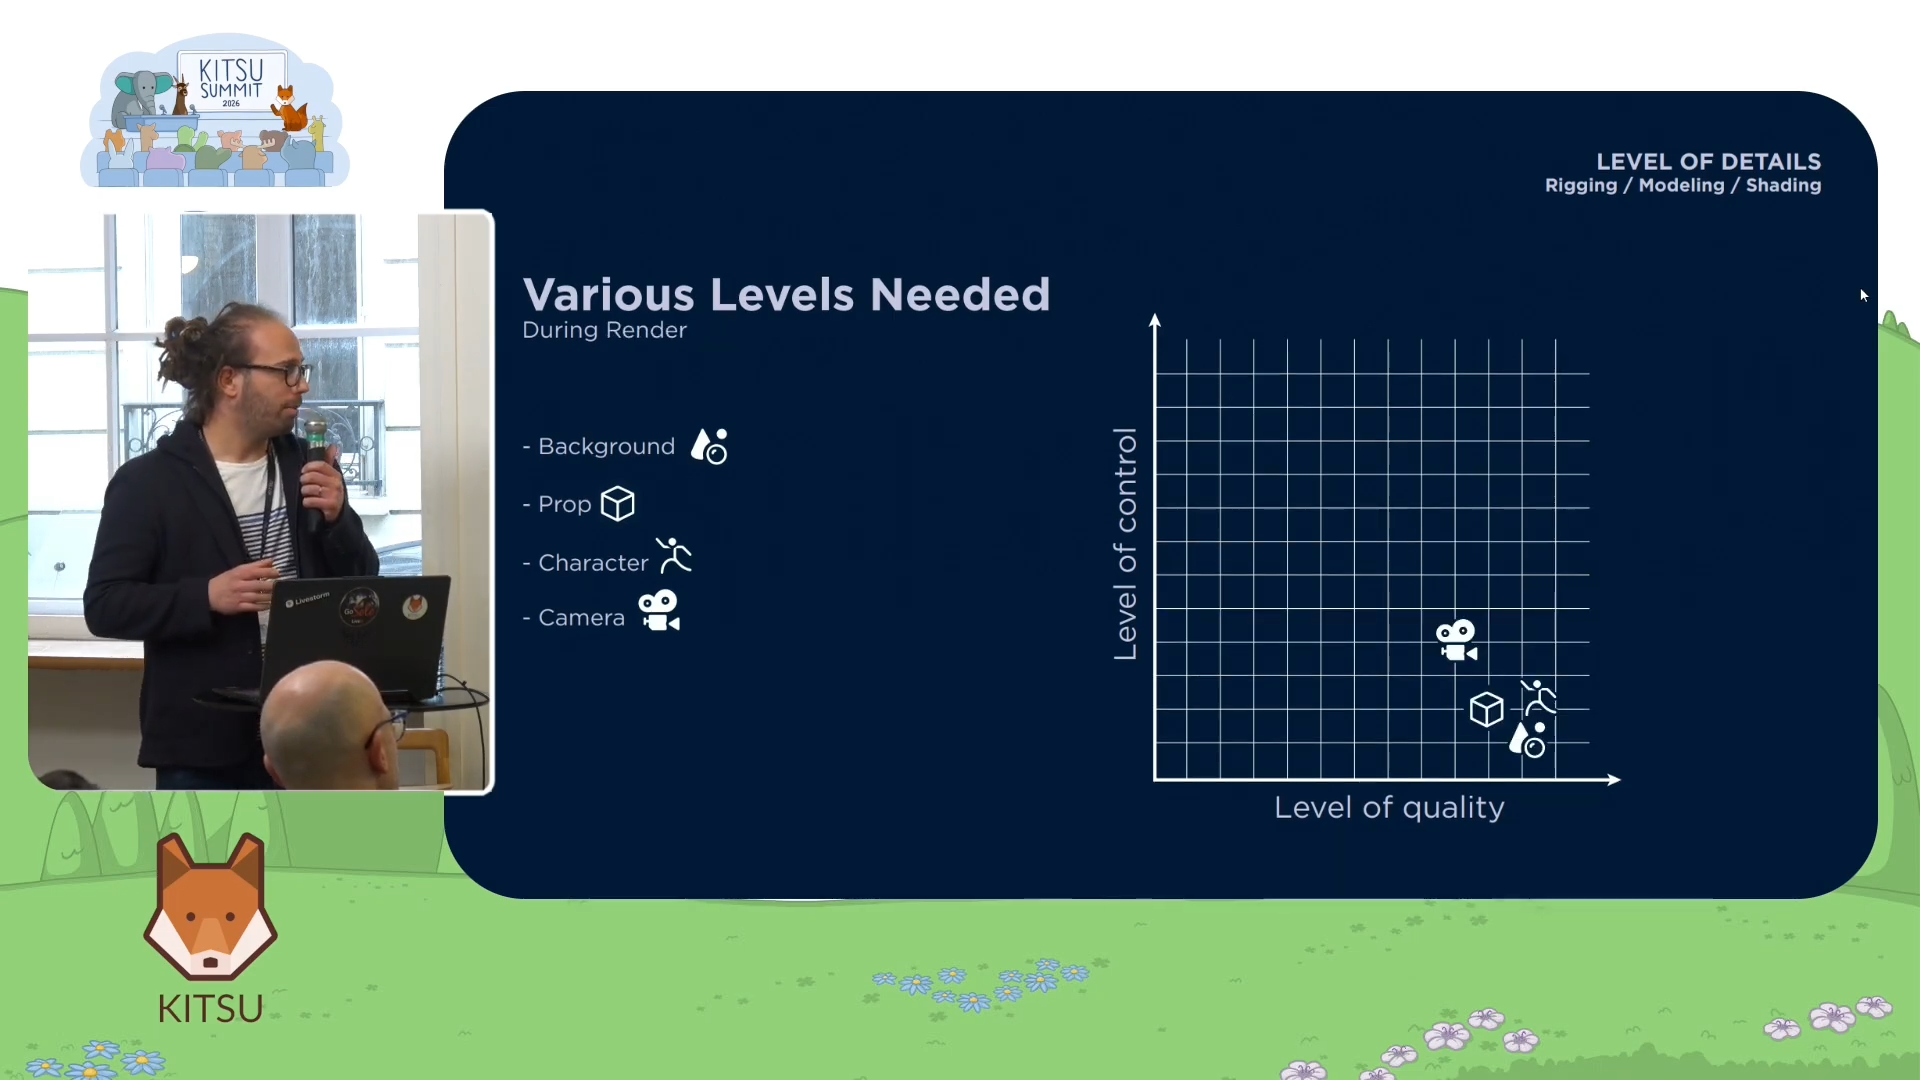
The real heart of Cube's approach is their level of detail (LOD) system. Rather than building it around technical convenience, they designed it by going back to what each stage of production actually needs.
- For layout, artists need to frame shots and dress sets. They need to know what assets look like, but they do not need final rendering quality. They need full camera control, but characters and props can be relatively lightweight.
- For animation, the scene needs to be light enough to maintain a good frame rate. A scene that does not lag is a scene that animates better, and that directly affects the quality of an animator's work.
- For rendering, the logic inverts entirely. Animation is locked and baked. Visual quality becomes the priority, and everything gets pushed to its maximum definition.
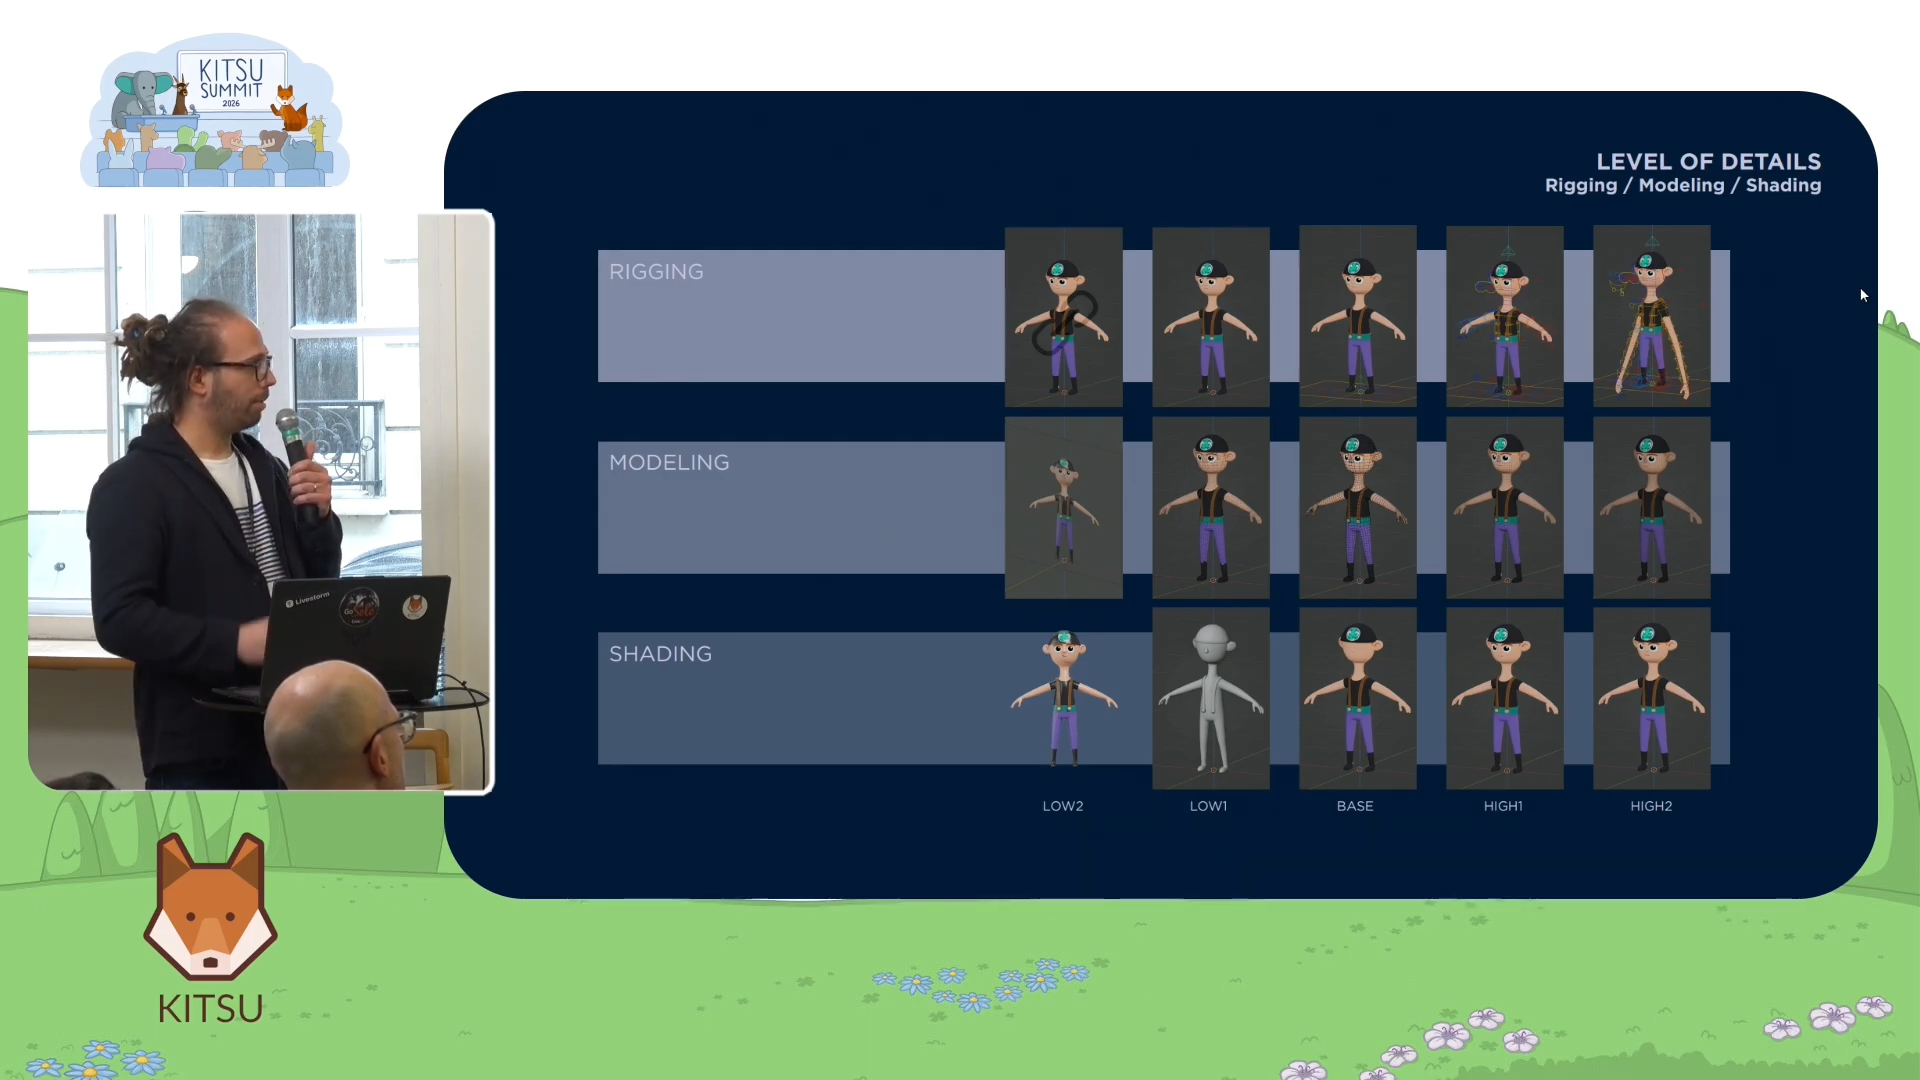
Cube codified this into a concrete system with multiple levels across three dimensions: modeling, shading, and rigging.

On the modeling side, the base mesh sits at the center. This is the retopologized version validated by the modeler, production, and directors. Moving upward in detail, artists can access a subdivided version for rendering and a more subdivided version with displacement. Moving downward, there is a decimated version for distant characters and a flat plane for very distant background figures that do not need volume at all.
On the shading side, the equivalent range runs from the flat plane image through a color-per-object mode (no real shader, just color information), an optimized viewport shader for animation, the full render shader, and finally an advanced shader with displacement maps and high-resolution textures.
Rigging works differently. The level of detail for rigging is not always a separate file but often an instruction about how to import the asset. At the lowest level, the asset is simply referenced and locked in the scene. Moving up, artists gain object-level access, then a simple "short rig" for layout timing, then the full animation rig, and in some cases a specialized heavy rig used only for specific shots.
From Theory to the Pfffirates Project
To make this concrete, Axel walked through the Pfffirates project in detail. The "Pfffirates" universe features inflatable plastic characters, which introduced a specific shading challenge: a displacement map was sometimes needed to add small creases to the inflatable surfaces.
For each character, the modeling LOD range covered the retopologized base mesh, a displacement-enabled version, a decimated version for mid-distance, and a flat plane for the background. The shading range ran from the plane image through a basic shader with a lightweight JPEG map (necessary because single-mesh inflatable characters made pure color-per-object shading tricky), the render shader, and the displacement-enabled heavy shader.
For rigging, each character had five levels: a pure reference (locked in the scene), an object-level import for applying caches and position references, a short layout rig, the full animation rig, and a special superpower rig specific to each character. That last level was not loaded in every shot because of its frame rate cost.
The same structure applies to props. Even the boat, which functions as both a prop and a set, followed the same logic. Because it served as a play space for characters, Cube capped it at four levels of detail and used a separate set-dressing asset for higher definition when needed.
Configuring It All with Ronald Reglages
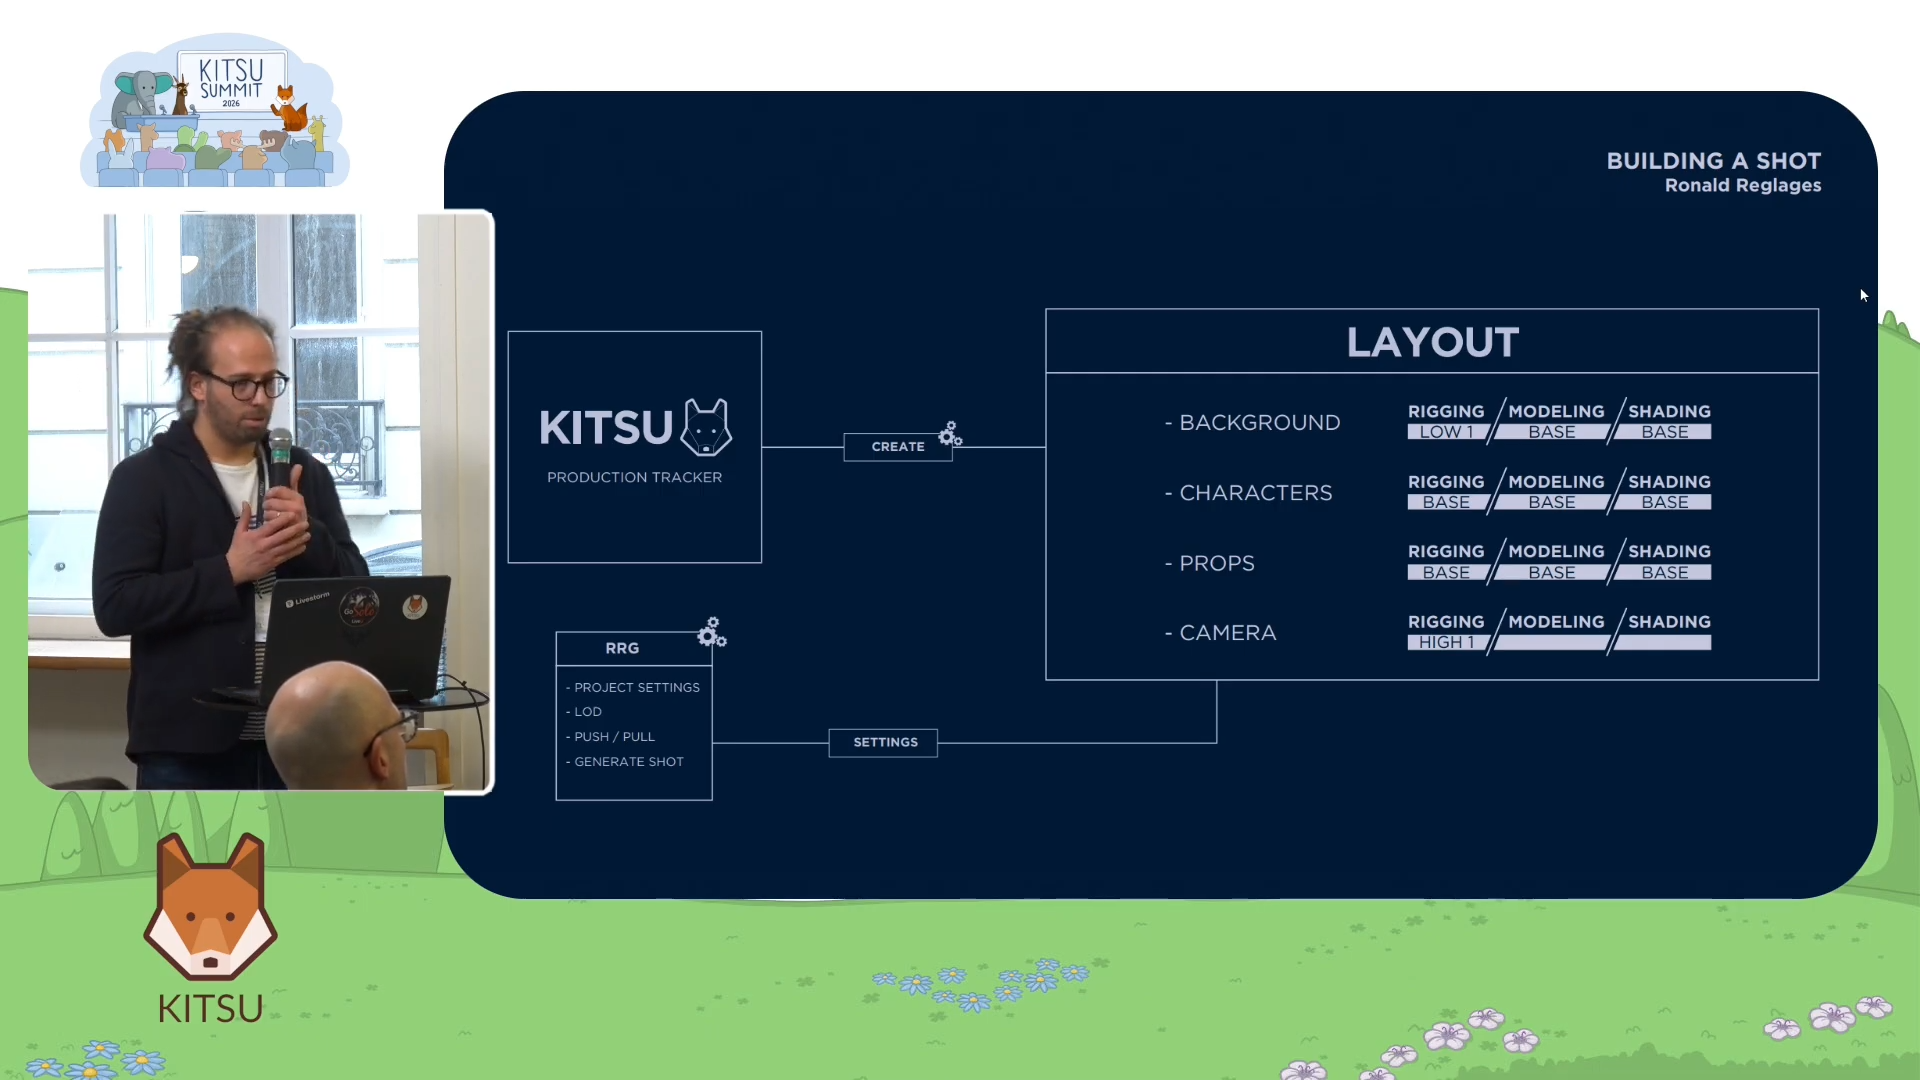
Translating this LOD system into actual production settings happens through an in-house tool Cube calls Ronald Reglages. For studios without an equivalent, think of it as a project-level configuration file with a graphical interface. It holds the Blender version, add-on versions, render farm queue names, camera naming conventions, and most critically, a section that defines exactly how each asset type should be imported at each pipeline step and at which level of detail.
For layout, Ronald Reglages instructs the system to import sets at object level for set dressing, characters and props with a basic rig, but cameras with a full rig since camera moves need to be finalized at this stage. For rendering, sets come in as references to keep file sizes manageable, while characters and props come in at the object level so modifiers like subdivision can still be applied.
"All of this is adjustable per project and per step," Axel noted. He gave the example of an upcoming Xilam racing car project where layout will likely require full rigs from the start, because placing characters in default poses inside vehicles would confuse clients reviewing the work.
Non-Destructive Overrides at the Shot Level
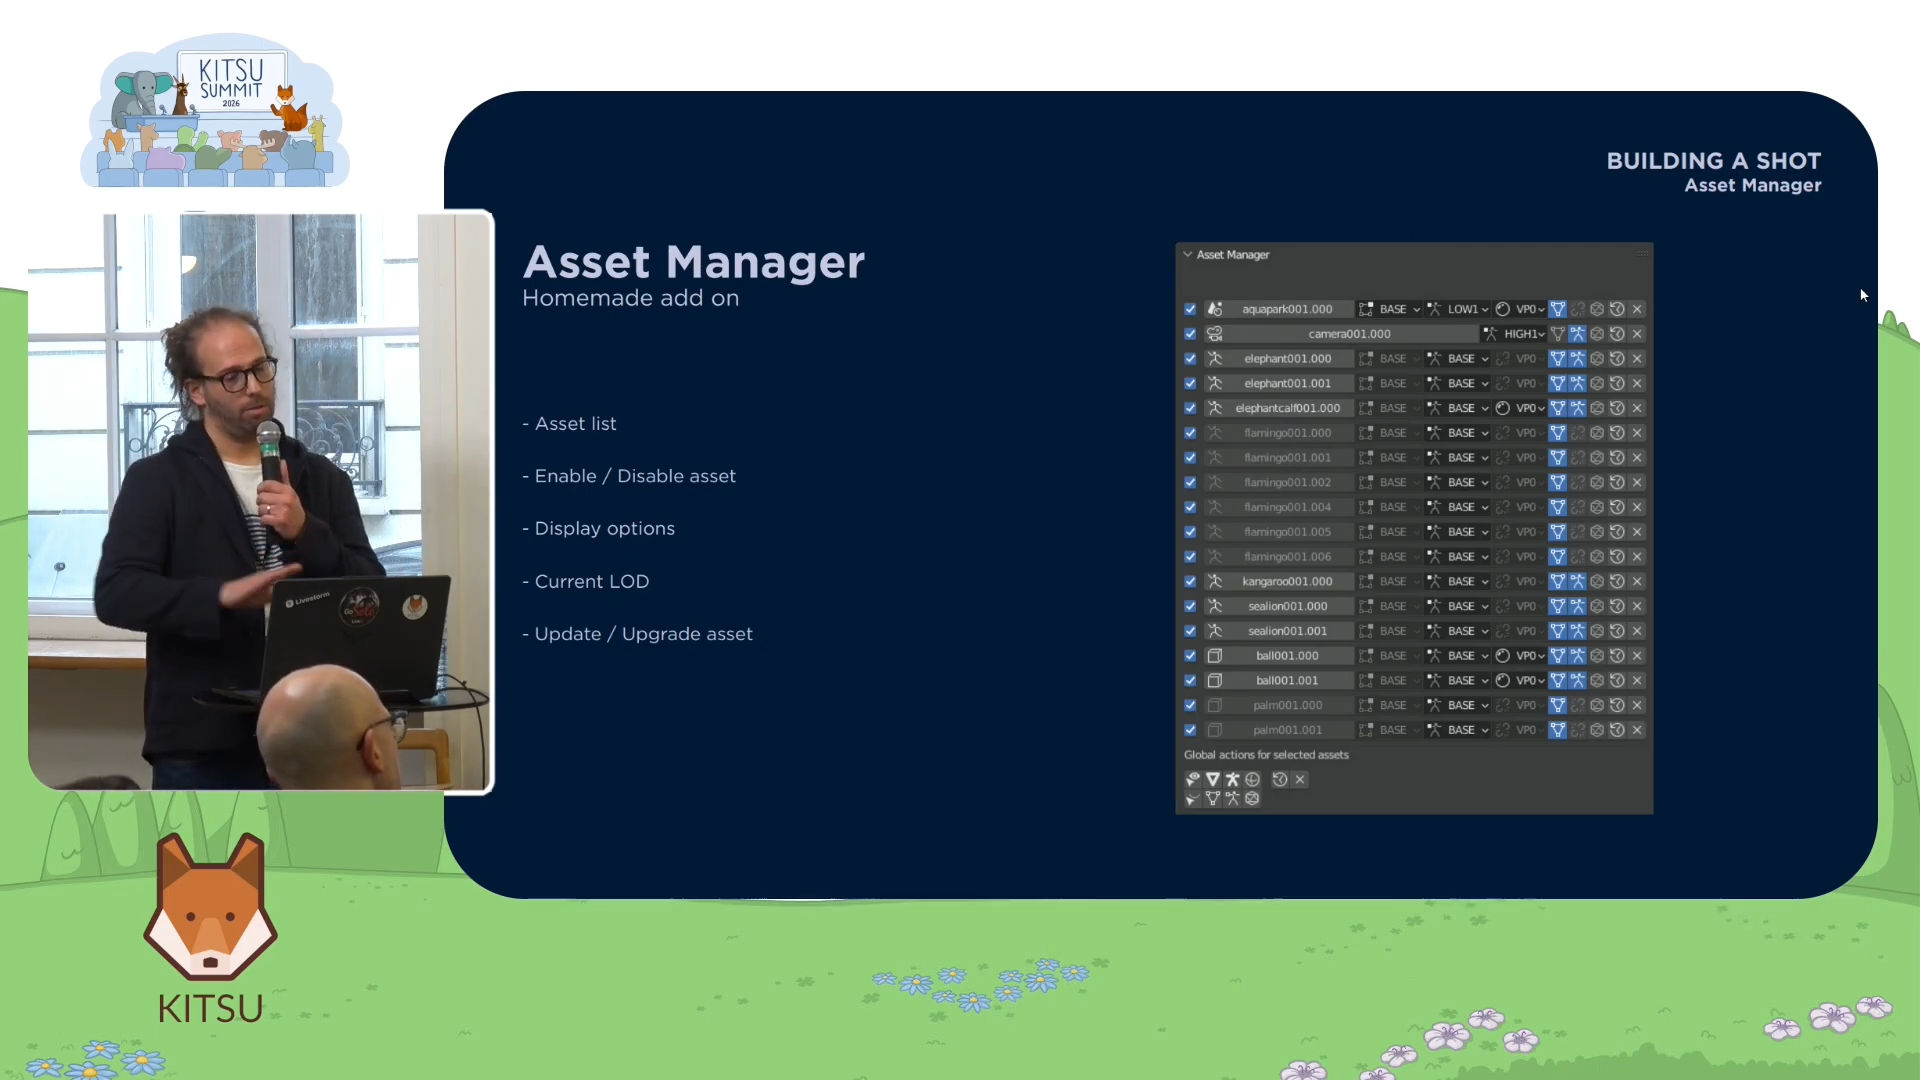
One of the most practically powerful features Axel described is the ability to override LOD settings per shot or in batch, without losing work.
When transitioning from layout to animation, artists can batch-upgrade all rigs to a higher definition level. Within an individual shot, the asset manager lists every asset with its current LOD and lets artists upgrade or downgrade individual elements. If one foreground palm tree needs a slightly higher modeling level for framing validation, an artist can upgrade that single element while leaving everything else at the lighter layout setting.
The critical feature is that this process is non-destructive. When an asset's rig level changes, the system saves the animation action data and constraint information, then reapplies it to the new rig version. Bone names must match between rig versions for this to work cleanly, and downgrading inevitably involves some data loss, but the system preserves as much as possible.
Where Geometry Nodes Take This Next
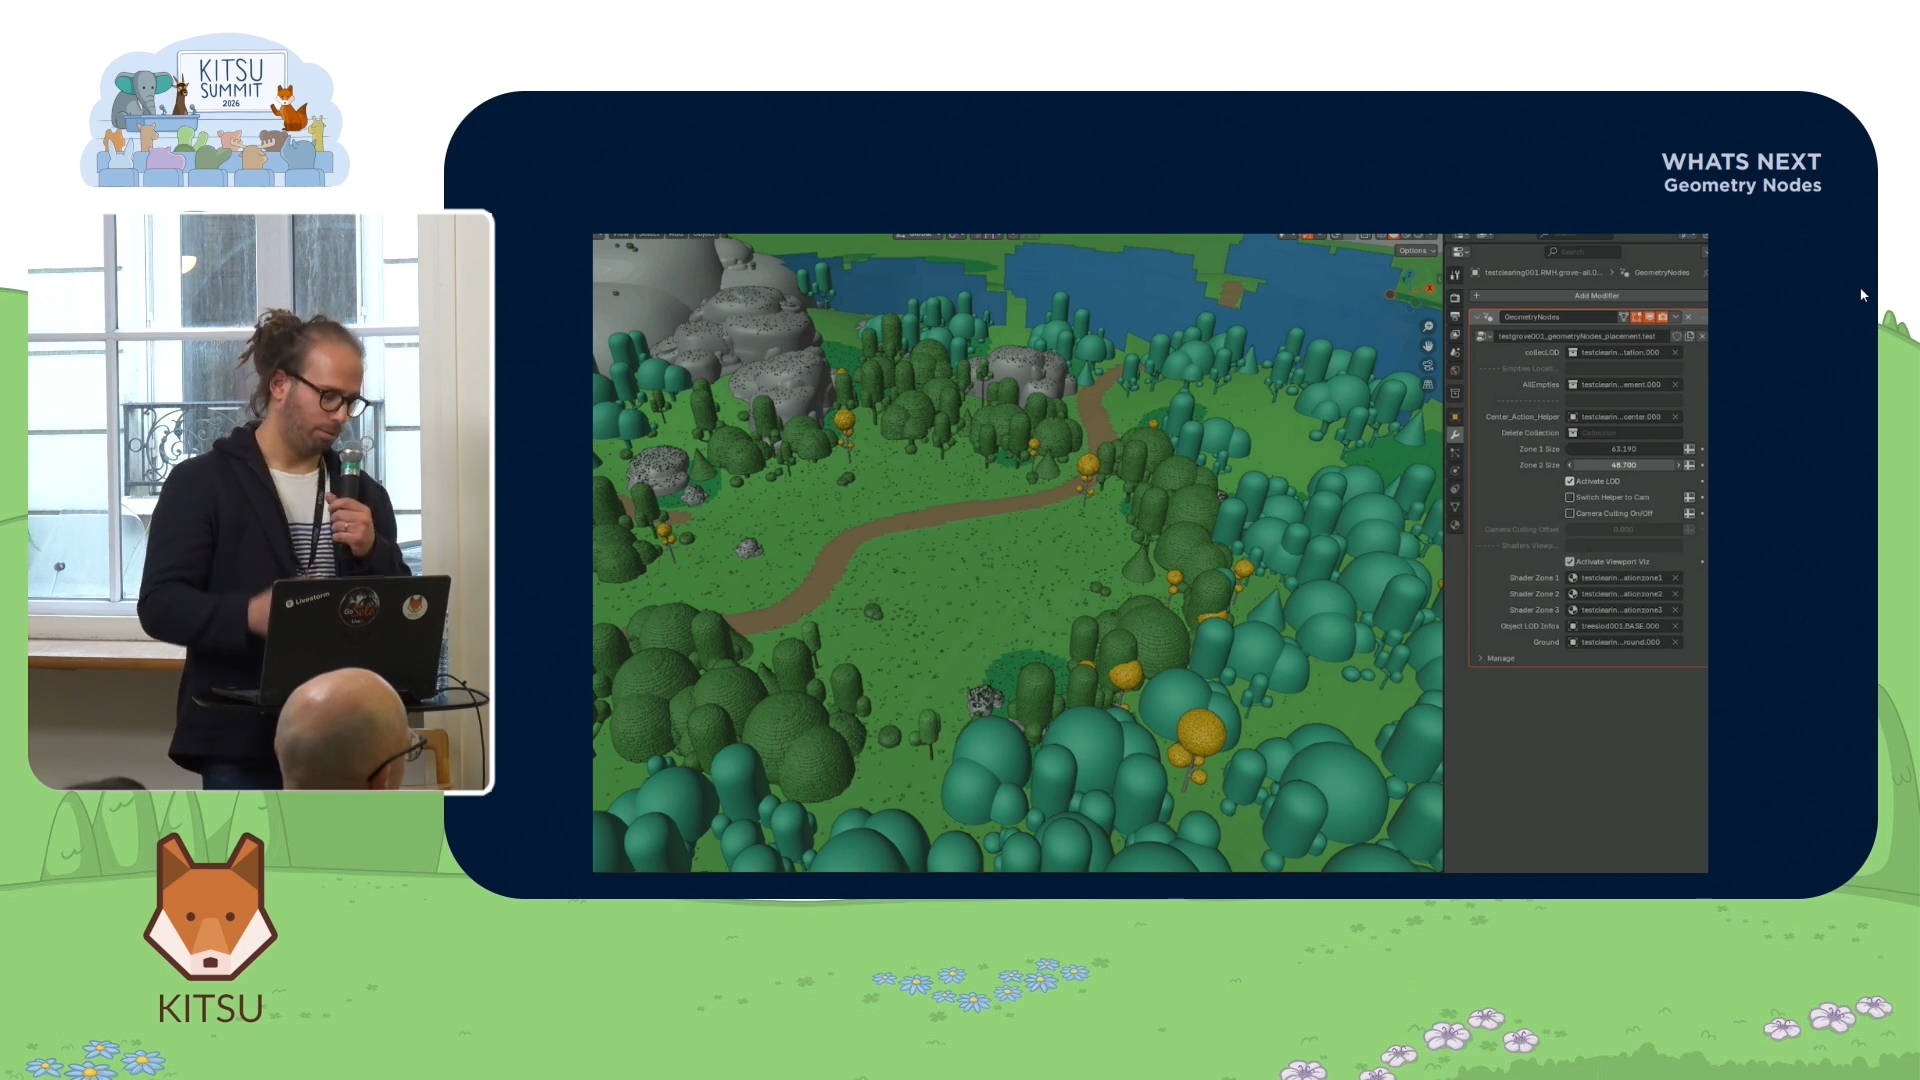
In Piggy Builder, Cube's most recently completed series, they began moving toward a more procedural approach using Blender's Geometry Nodes.
Rather than maintaining separate Blender files for each LOD, Cube consolidated all levels into a single master scene file. The separate files still exist on disk and are imported into that master scene, but from there, Geometry Nodes can procedurally assemble sets by applying different LOD ranges to different assets based on their distance from the camera or their role in the action. A micro-rig added at the shot level can redefine the Geometry Nodes behavior dynamically, moving elements based on what the scene requires.
The trade-off is memory. Because all representations load simultaneously, RAM usage increases noticeably and scene open times become longer: "The RAM cost was real, but it was worth it compared to the ease of use for the artists. They could really have fun and create genuinely beautiful sets."
The goal is to integrate this approach properly into all future set pipelines.
Key Studio Takeaways
Axel closed his talk by distilling the entire system into three principles:
- The first is having a clear single source of truth. For Cube, that is Kitsu. Every asset status, every shot status, and every production decision lives there. Artists do not need to guess where something is.
- The second is building assets that adapt to production needs. The LOD system exists not as a technical nice-to-have but because layout, animation, and rendering genuinely require different things. Building that flexibility in from the start prevents slowdowns at every stage.
- The third is treating the pipeline as a living investment. Each production at Cube adds something to the shared infrastructure. The work done on Tangranimo made Pfffirates easier. The work done on Pfffirates made 7 Bears more manageable. Studios that approach each project as a fresh start forfeit that compounding value entirely.
For animation studios moving toward more professional production practices, Cube's experience offers a clear argument: the tools matter less than the philosophy behind them. Kitsu does not make a pipeline stable by itself. What makes a pipeline stable is the discipline to define clear states for every asset, communicate those states consistently, and design workflows that meet production needs at each step rather than forcing every step to use the same definition of "done." That's where Kitsu helps tremendously, thanks to its flexible architecture and open-source nature.