Everytime we visit a studio or discuss with a CG Artist about pipelining, the question of the file hierarchy comes at some point. It may look simple but truth that it requires a lot of attention and tweaking. We already covered that topic in a previous article so we won’t go into the details. What we want to show you today, is how easy it is to build and manage your file tree with CGWire API and its Python client.
Let’s go for our first Pipeline tutorial!
1. Configuration
We assume you have a running version installed on your server and accessible through your local network. If it is not the case and wan to start quickly, you can run an API instance through our Docker container.$ docker build -t cgwire .
$ docker run \
-ti -rm \
-p 80:80 \
-—name cgwire \
-v zou-storage:/var/lib/postgresql \
-v zou-storage:/opt/zou/zou/thumbnails \
cgwire
Once the API is up, it’s easy to generate your file hierarchy with a simple python script. In the following we assume that the API is accessible from the http://localhost/api endpoint
Prior to write our Python script, it requires you install the API client (Gazu) in your Python dependencies: pip install gazu
Now we are ready, can write our script (name: build_file_tree.py), we must start by configuring the Python client and log in it to the API:import gazugazu.set_host("http://localhost/api")
gazu.log_in("admin@example.com", "default")
2. Assets and shots
Once the Python client is properly connected to the API, you can run the script that will create the elements of your production. Here, we create a simple production with three assets and three shots:new_prod = gazu.project.new_project("Super production")
characters = gazu.asset.new_asset_type("Characters")
props = gazu.asset.new_asset_type("Props")rabbit = gazu.asset.new_asset(new_prod, characters, "Rabbit")
monkey = gazu.asset.new_asset(new_prod, characters, "Monkey")
chair = gazu.asset.new_asset(new_prod, props, "Chair")episode = gazu.shot.new_episode(new_prod, "E01")
sequence = gazu.shot.new_sequence(new_prod, episode, "SE01")
shot = gazu.shot.new_shot(new_prod, sequence, "SH01")
shot = gazu.shot.new_shot(new_prod, sequence, "SH02")
shot = gazu.shot.new_shot(new_prod, sequence, "SH03")
3. Tasks
All the elements of our production are now set up. We can move to the next part, creating the related tasks:modeling = gazu.task.get_task_type_by_name("Modeling")
setup = gazu.task.get_task_type_by_name("Setup")
animation = gazu.task.get_task_type_by_name("Animation")
render = gazu.task.get_task_type_by_name("Render")for asset in gazu.asset.all_assets_for_project(new_prod):
gazu.task.new_task(asset, modeling)
gazu.task.new_task(asset, setup)for shot in gazu.shot.all_shots_for_project(new_prod):
gazu.task.new_task(shot, animation)
gazu.task.new_task(shot, render)
4. File tree
We can now move to the final step, creating the folders of our file hierarchy:import os
gazu.files.set_project_file_tree(new_prod, "simple")for asset in gazu.asset.all_assets_for_project(new_prod):
for task in gazu.task.all_tasks_for_asset(asset):
path = os.path.dirname(
gazu.files.build_working_file_path(task))[1:]
)
os.makedirs(path)
for shot in gazu.shot.all_shots_for_project(new_prod):
for task in gazu.task.all_tasks_for_shot(shot):
path = os.path.dirname(
gazu.files.build_working_file_path(task))[1:]
)
os.makedirs(path)
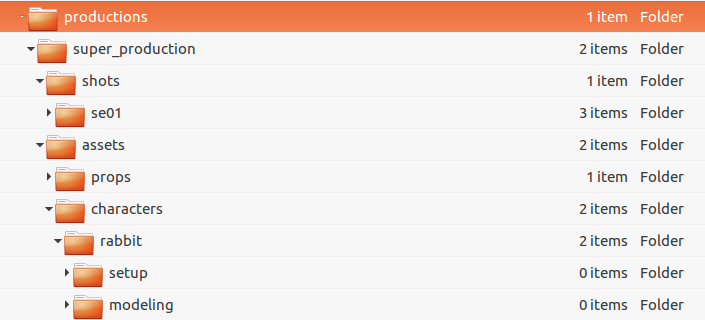
That’s it! We now have all our file hierarchy. Let’s see the result:$ tree -d my_root_folder
└── productions
└── super_production
├── assets
│ ├── characters
│ │ ├── monkey
│ │ │ ├── modeling
│ │ │ └── setup
│ │ └── rabbit
│ │ ├── modeling
│ │ └── setup
│ └── props
│ └── chair
│ ├── modeling
│ └── setup
└── shots
└── se01
├── sh01
│ ├── animation
│ └── render
├── sh02
│ ├── animation
│ └── render
└── sh03
├── animation
└── render
The folder can be customized through templates that will match your need. Here is the one we used:{
"working": {
"mountpoint": "/my_root_folder",
"root": "productions",
"folder_path": {
"shot": "<Project>/shots/<Sequence>/<Shot>/<TaskType>",
"asset": "<Project>/assets/<AssetType>/<Asset>/<TaskType>"
}
}
To sum up, with a simple script we generated production information and generated all the required folder to work properly. And the good news is that it scales easily for a production with thousands of assets and shots. We would be glad to know what you think about it.
This blog is dedicated to CG pipeline and production management. If you are interested in file hierarchy scripting, you will probably enjoy our articles. We have a Discord channel too where you can discuss about your own problems and solutions and learn from others.