
Spending hours manually duplicating geometry, reshaping, or animating repetitive movements in Blender isn't fun. Some workflows are like that: you need to do repetitive tasks over and over again, with only slight variations.
But there is a smarter, faster way to create procedural effects called geometry nodes. They can seem intimidating and take time to master, but by the end of this article, you’ll know what geometry nodes are, why they matter, and how to start using them in your own Blender projects.
What Are Geometry Nodes?
Geometry Nodes are Blender’s way of letting you create and manipulate models procedurally. Instead of editing mesh objects directly, you connect visual nodes that define operations like instancing, transforming, or scattering objects in a non-destructive, modular way.
Each node performs a small task, but when connected, they can create incredibly detailed results: from forests made of thousands of randomized trees to animated particle trails or architectural patterns. Geometry Nodes allow you to build once and control everything with adjustable parameters.
Why Geometry Nodes Are Important
Traditional modeling and animation workflows often depend on time-consuming manual adjustments where every change or variation requires direct edits to the model. Geometry Nodes revolutionize this process by introducing procedural control, a system that allows you to generate and modify models dynamically through input values, randomness, or mathematical relationships.
This approach offers several major advantages. It makes you more productive by letting you update or randomize complex scenes instantly without the need to rebuild them from scratch. It also brings flexibility to your pipeline because parameters can be adjusted at any stage of production. Geometry Nodes open the door to experimentation for producing intricate shapes, patterns, and effects that would be difficult or impossible to achieve by hand, like generating a large patch of grass. This feature is ideal for large-scale modeling like crowd simulations or realistic natural environments.
You can find the complete source code for the example Blender–Kitsu integration showcased in this guide on our GitHub:
🔗 https://github.com/cgwire/blender-scripting-geometry-nodes
Adding a Geometry Node
I know the concept looks intimidating, but give me 5 minutes and we'll create your first geometry node setup.
- Open a new Blender project with a default cube.
- In the Geometry Nodes tab, click New to create a new geometry node group.
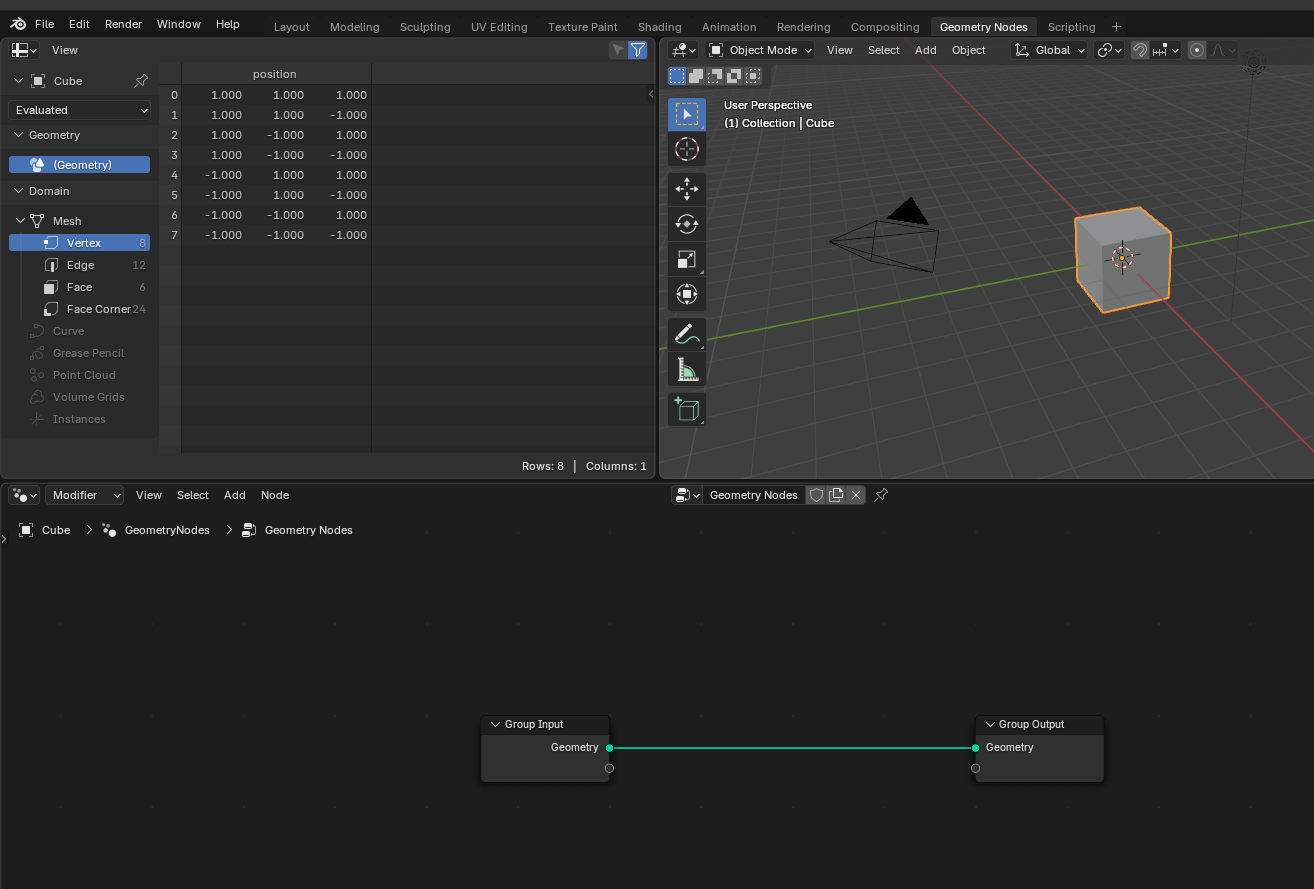
You’ll now see a blank node tree in the Geometry Node Editor workspace, with two default nodes: Group Input and Group Output. These represent the start and end of your data flow: geometry comes in, gets modified, and goes out.
To see your setup in action, just add your first node:
- Click Add → Geometry → Operations → Transform Geometry.
- Connect the Group Input → Transform Geometry → Group Output.
- Adjust the translation or scale values in the Transform node.
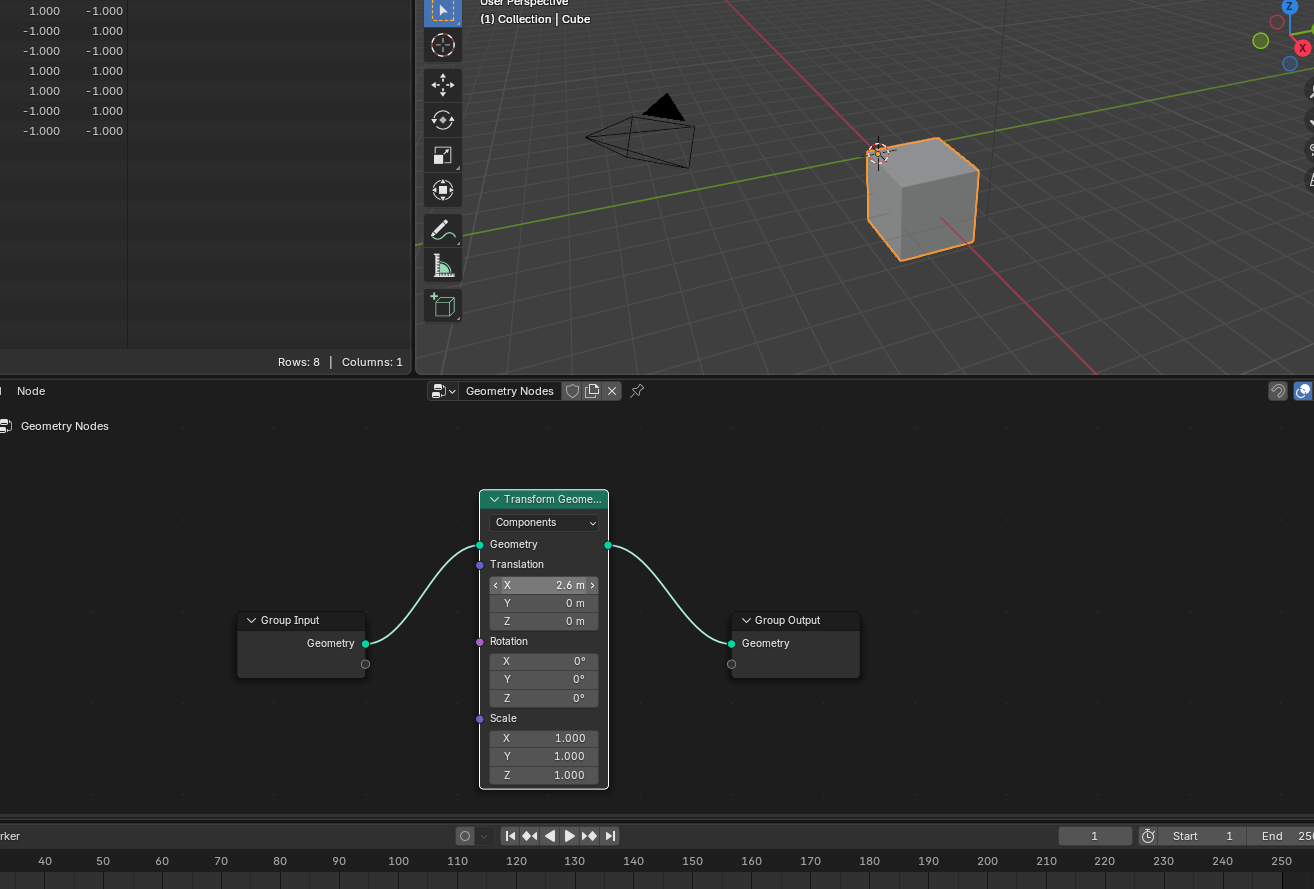
You’ll immediately see your object move or resize in the viewport. Congratulations, you’ve just built your first procedural modifier!
Geometry Nodes fall into several broad categories, each handling different aspects of your scene. Think of these categories as toolboxes: each one focuses on a different kind of task, from generating shapes to controlling data or math behind the scenes.
Here is a quick overview of the different node types to find the ones you need for a new workflow:
1. Input Nodes
Input nodes provide the starting information for your node tree. They bring in existing data from your object or scene, like position, normal, index, or object info that other nodes can use to calculate or transform geometry.
For example, an Input → Scene → Object info node gives you all the information you need about an object instance to perform calculations.
When creating a new node tree, Blender will always add a new Input Group node representing the group of models in the current scene.
2. Output Nodes
Output nodes define what leaves your node system: the final geometry that Blender renders or displays. The Group Output node is the most common one, connecting the result of your entire node network back to your object in the viewport.
Other specialized outputs (like Material Output in shader setups) pass data to different parts of Blender’s system. In Geometry Nodes, the Output stage determines what geometry, instances, or attributes are visible in the result.
3. Geometry Nodes
Geometry nodes directly modify, combine, or generate geometry, the actual shapes in your scene.
They’re the core of procedural modeling. Instead of sculpting by hand, you can create systems that generate geometry automatically, and you can tweak them later without destroying your base mesh.
4. Mesh Nodes
Mesh nodes focus on fine control over mesh structures: the vertices, edges, and faces that make up your geometry. They let you access and modify specific mesh components or convert geometry types.
When you need precise topology control, go for mesh nodes. They’re perfect for procedural modeling tasks like creating grids, manipulating edge loops, or generating new topology from existing meshes.
5. Instance Nodes
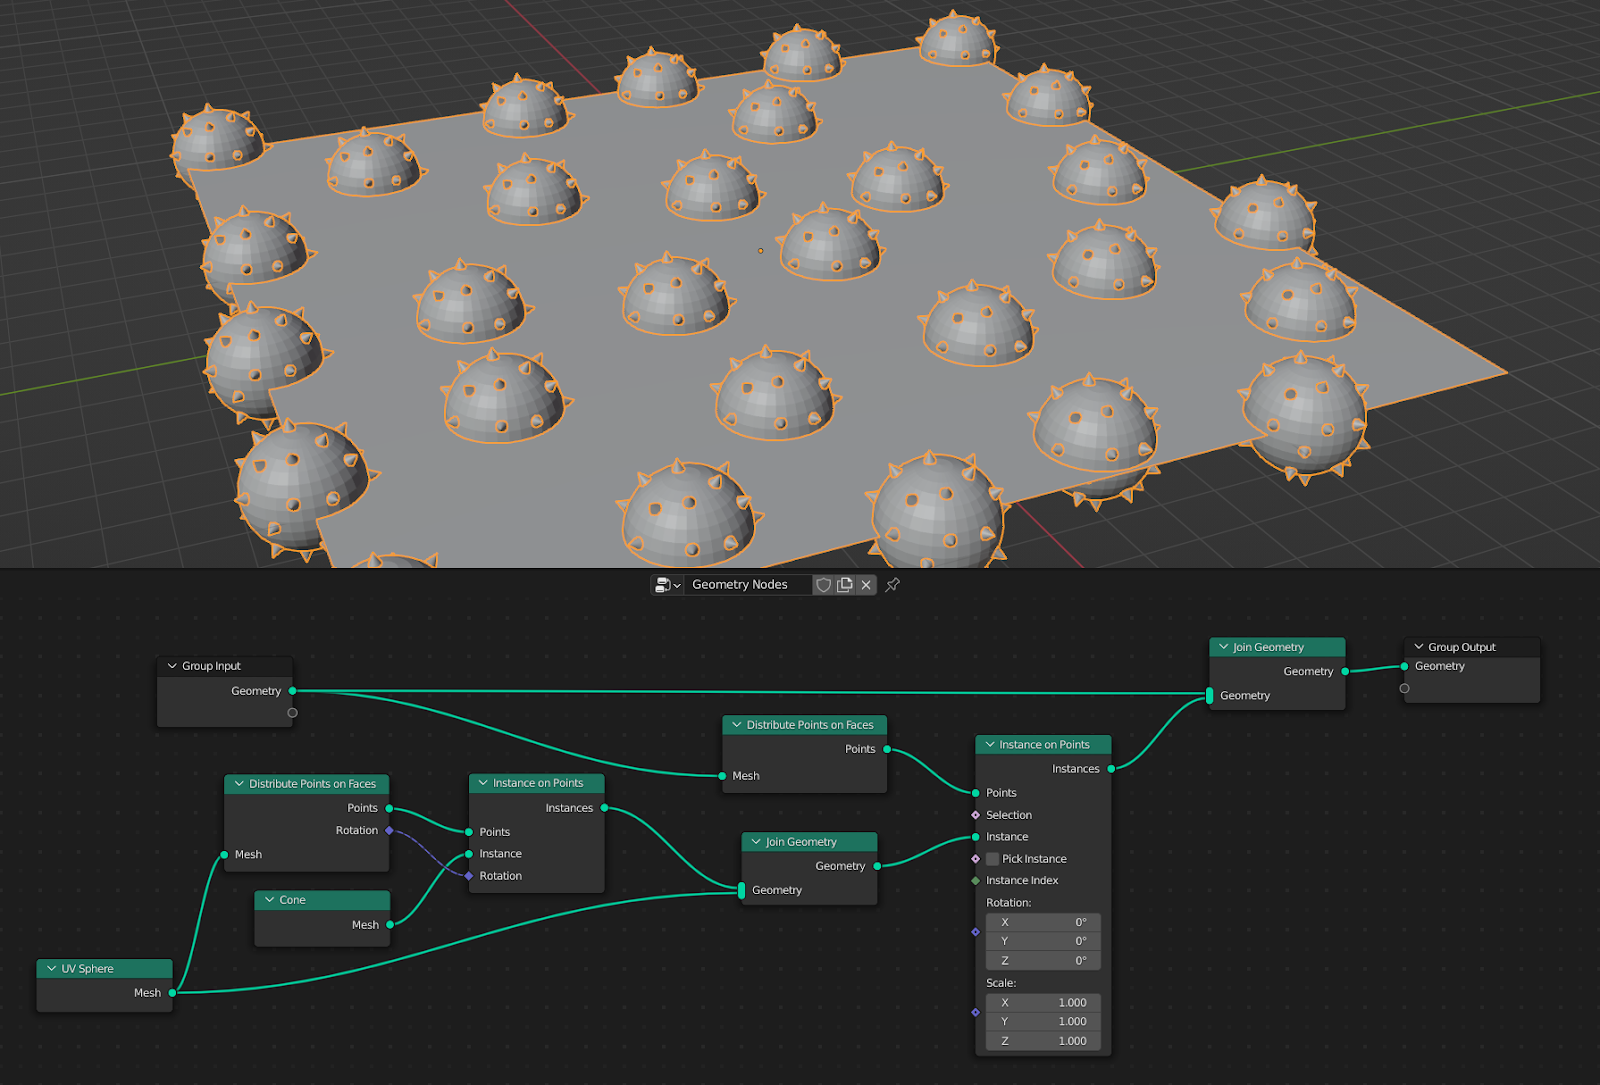
Instance nodes create copies (instances) of objects, scattered across surfaces or points. Nodes like Instance on Points or Realize Instances handle this.
Instancing is one of the most powerful features in Geometry Nodes because it lets you duplicate thousands of objects (like trees, rocks, or particles) without slowing down your scene by only rendering one real copy and referencing it multiple times.
6. Attribute Nodes
Attribute nodes control or pass around custom properties attached to geometry, like color, scale, or random values per point. These attributes can be used to drive transformations, materials, or effects.
Attributes let you add variation and control to your procedural systems. You can randomize the size of scattered objects, color particles differently, or link material effects to geometry data.
7. Utilities and Fields
Utility nodes handle the logic and math behind your geometry network. They include operations like Math, Vector Math, Compare, or Map Range, and they’re often used to process or control other nodes’ inputs, like in a programming language.
They’re the brains of your setup, allowing you to build relationships, create gradients, randomize values, etc.
8. Curve Nodes
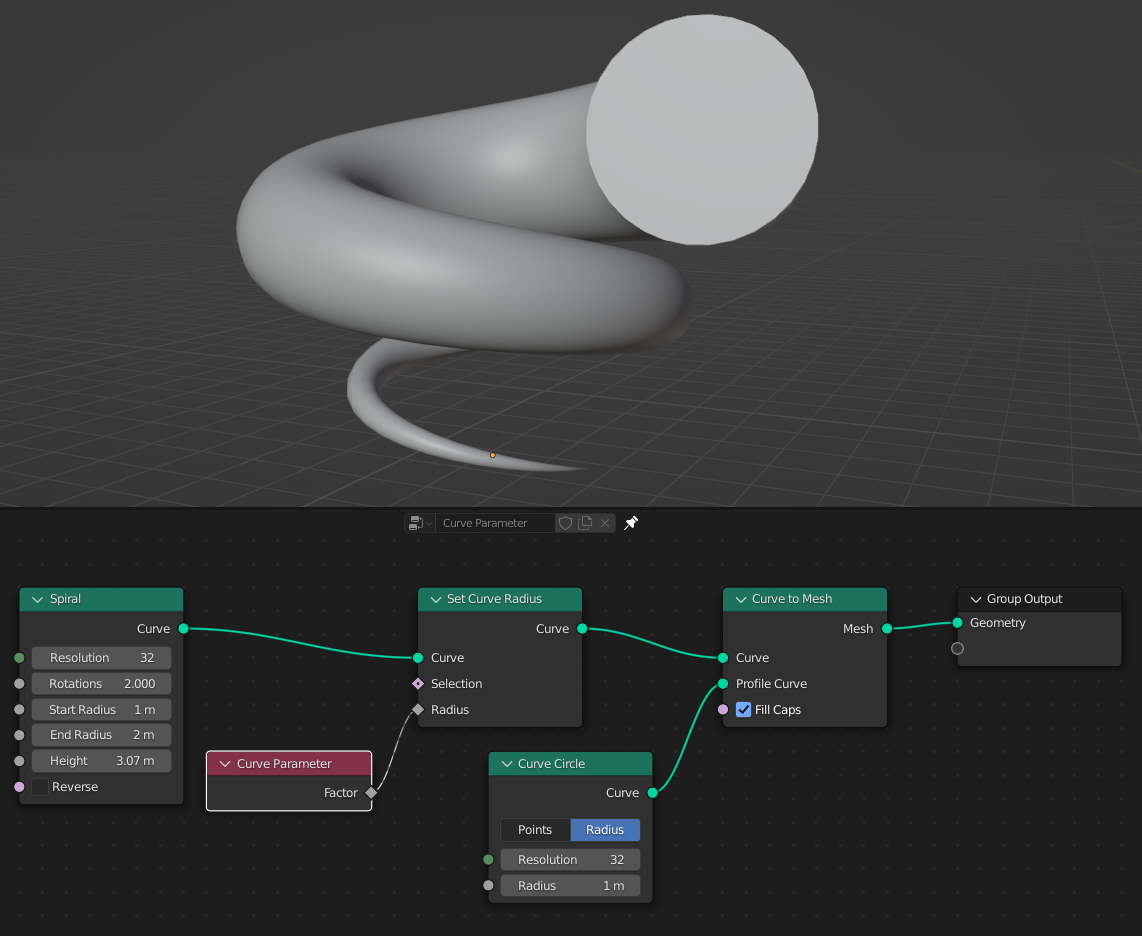
Curve nodes work with curve-based geometry like lines, splines, or paths. They’re useful for generating cables, vines, roads, or abstract motion trails. Nodes like Resample Curve, Curve to Mesh, and Set Curve Radius let you adjust the shape, resolution, or thickness of curves procedurally.
Curves can also drive instancing, letting you place objects along a path or animate their movement over time.
9. Grease Pencil Nodes
Grease Pencil nodes integrate Blender’s 2D drawing system into the Geometry Nodes workflow. You can procedurally modify strokes, convert drawings into geometry, or apply effects like noise, extrusion, or deformation to 2D lines.
These nodes bridge the gap between 2D animation and procedural design, giving artists new ways to stylize motion graphics or hybrid 2D/3D scenes.
10. Point Nodes
Point nodes manipulate individual points in your geometry: the fundamental building blocks used for scattering, positioning, or transforming instances. You can add, move, or rotate points, or assign attributes like color or scale to each.
For instance, Distribute Points on Faces generates evenly or randomly placed points across a surface, which can then serve as placement positions for instances like grass or particles.
11. Volume Nodes
Volume nodes let you create and manipulate volumetric data like fog, smoke, or procedural density fields. You can use them to generate 3D textures, shape clouds, or fill geometry with density-based effects and open the door to atmospheric or organic effects that go far beyond surface modeling.
12. Material Nodes
Material nodes assign or modify materials and shading data. The Set Material or Material Index nodes let you dynamically apply different materials based on attributes, random seeds, or regions of your model.
This makes it easy to, for example, color-code parts of a structure or assign materials procedurally to scattered objects.
13. Texture Nodes
Texture nodes sample or generate procedural textures that can drive geometry transformations or visual variation. They can provide grayscale masks, noise patterns, or gradients that influence scale, displacement, or color.
By combining texture data with math or attribute nodes, you can create natural randomness for uneven terrain, wavy surfaces, or patterned distribution.
14. Group Nodes
Group nodes bundle multiple nodes into a reusable unit. They’re crucial for organizing complex setups and keeping your node trees clean. You can expose parameters on the group’s input/output to make them adjustable, effectively turning your custom setup into a new super node.
Once you start building your own groups, you’re not just using Geometry Nodes: you’re creating your own procedural tools.
15. Hair Nodes
Hair nodes are designed to generate, style, and control procedural hair or fur systems. They provide access to strand length, density, and grooming attributes, allowing you to simulate everything from grass fields to character hair.
These nodes replace older particle-based workflows with a modern, procedural approach that integrates seamlessly with Blender’s new hair system.
Conclusion
Geometry Nodes can seem abstract or intimidating at first, but they are some of the most exciting features in Blender. Once you understand how to combine nodes, you can generate entire animations, environments, or visual effects driven by procedural logic rather than manual edits.
Don’t feel like you need to memorize them all, however. Most Geometry Nodes setups rely on a handful of key nodes that you’ll naturally get comfortable with as you experiment.
In our next article, we’ll go a step further: you’ll learn how to create your own custom node groups using scripts to automate effects while reducing the complexity of your workflows for unique animation pipelines.


