Animation studios rely on breakdown lists to track which assets must appear in each shot.
Picture this. You’re a VFX artist staring at a blank Blender viewport for your latest production. Your manager hands you the detailed list of assets, shots, and timing cues and says, "Turn this into a Blender scene."
Your first thought could be to log in to your asset manager and place every object manually. But what about complex scenes with hundreds of assets?
This is the moment where a simple automation can save the day. With Python Blender scripting, you can read Kitsu breakdown data and generate an initial scene automatically in a few minutes.
In this article, we walk through a full example: fetching breakdowns via the Gazu Python API, creating a fresh Blender scene, downloading the assets, and importing them into Blender. By the end, you’ll have a minimal pipeline that builds scenes automatically, ready for layout or animation.
You can find the complete source code for the example integration showcased in this guide on our GitHub:
🔗 https://github.com/cgwire/blender-kitsu-automated-scene-composition
1. Getting the Breakdown
Every 3D shot begins as a blank canvas, but the instructions for filling that canvas already exist in Kitsu: the breakdown dictates exactly what needs to be on stage before the animator begins working.
A typical breakdown provides the essential narrative context your script needs to assemble the scene: the stage (start and end frames, duration, and other annotations stored in the sequence information), and the cast (the actual breakdown of character models, props, and environment assets).
Before writing code, you need to define the breakdown in the Kitsu dashboard. This is where you manually link your library of 3D assets to the specific shots where they are required. You aren't creating new models here, just casting existing "actors" (assets) to a specific shot:
- Enter your production - Navigate to your project in Kitsu and open the Shots tab.
- Locate the casting sheet - Look for the Breakdown tab (usually found on the right-hand panel or a dedicated tab depending on your version).
- Select the shot - Click on the specific shot you want to populate (e.g.,
SH01) to open the detailed casting view. - Assign the assets - In the right side panel, click the + (Plus) button or "Add Asset." You can also specify the quantity of each asset you need here.
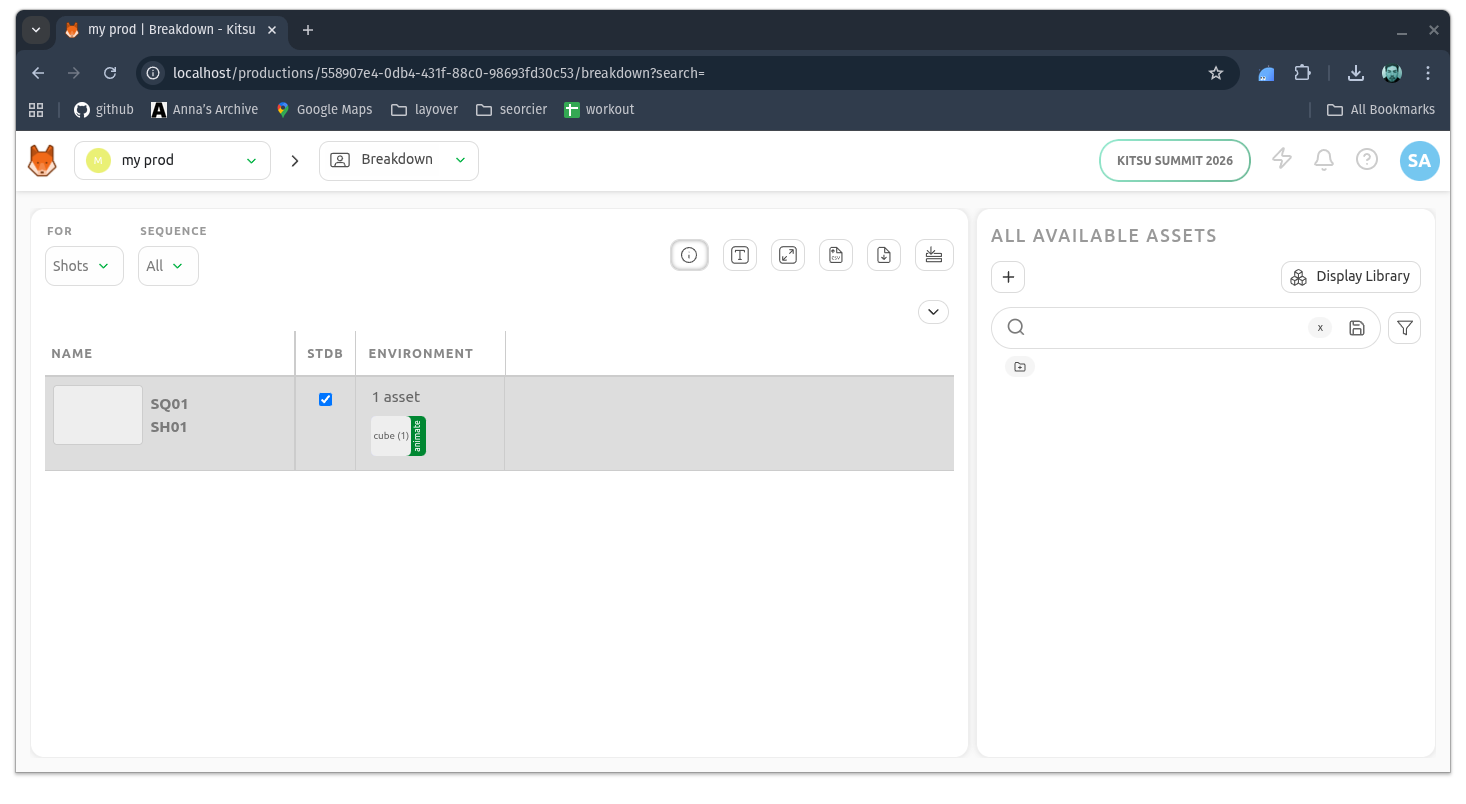
Make sure your Assets page is already populated with the models (Characters, Props, etc.) you intend to use.
Once you hit save, the link is established. Now, when your Python script asks Gazu, "Who is in this shot?", Kitsu will reply with the list of assets you just assigned. Your Python script acts as the bridge, parsing this casting to automatically populate the Blender viewport.
If you need a local development environment, have a look at how to install Kitsu from Docker in how Custom DCC Bridge guide.
While Kitsu holds the data, we need a way to fetch it. Enter Gazu, the Python SDK for Kitsu’s REST API:
import gazu

gazu.set_host("<http://localhost/api>")
user = gazu.log_in("admin@example.com", "mysecretpassword")

projects = gazu.project.all_projects()
project = projects[0]

sequence = gazu.shot.get_sequence_by_name(project, "SQ01")
shot = gazu.shot.get_shot_by_name(sequence, "SH01")

assets = gazu.casting.get_shot_casting(shot)
We connect to our local Kitsu instance, and then we pick our first production (you can also retrieve a production by name) and the shot we need the casting for.
We can use this shot ID to retrieve the corresponding casting of assets, the breakdown list.
2. Getting Assets From a Breakdown
Now that we know who is in the shot, we need to find out what they look like.
In Kitsu, an asset can have many preview files we can use depending on revisions. Our script needs to be able to navigate this data to get the last revision of each asset:
local_paths = []
for asset in assets:
    tasks = gazu.task.all_tasks_for_asset(asset["asset_id"])
    last_task = max(tasks, key=lambda x: x["updated_at"])

    preview_files = gazu.files.get_all_preview_files_for_task(last_task)
    last_preview_file = max(preview_files, key=lambda x: x["updated_at"])

    download_dir = "./previews"
    os.makedirs(download_dir, exist_ok=True)

    save_path = os.path.join(
        download_dir,
        last_preview_file["original_name"] + "." + last_preview_file["extension"],
    )
    gazu.files.download_preview_file(last_preview_file, save_path)

    local_paths.append(save_path)
For each asset, we retrieve a list of all corresponding tasks of any type ('Modeling', 'Animation', etc.) or status ('done', 'todo'...). We filter this list to retrieve the last updated task.
We can use this task ID to get the last corresponding preview file revision and download it to a local folder previews. We keep these download paths in memory for the importing step.
At the end of this loop, you have successfully turned database entries into tangible model files on your hard drive, ready for Blender to ingest.
3. Creating a New Blender Scene
With the asset files safely downloaded, the next task is preparing the Blender environment to receive its new cast member.
The bpy module, Blender's native Python API, acts as your command console allowing you to manipulate every element of the application.
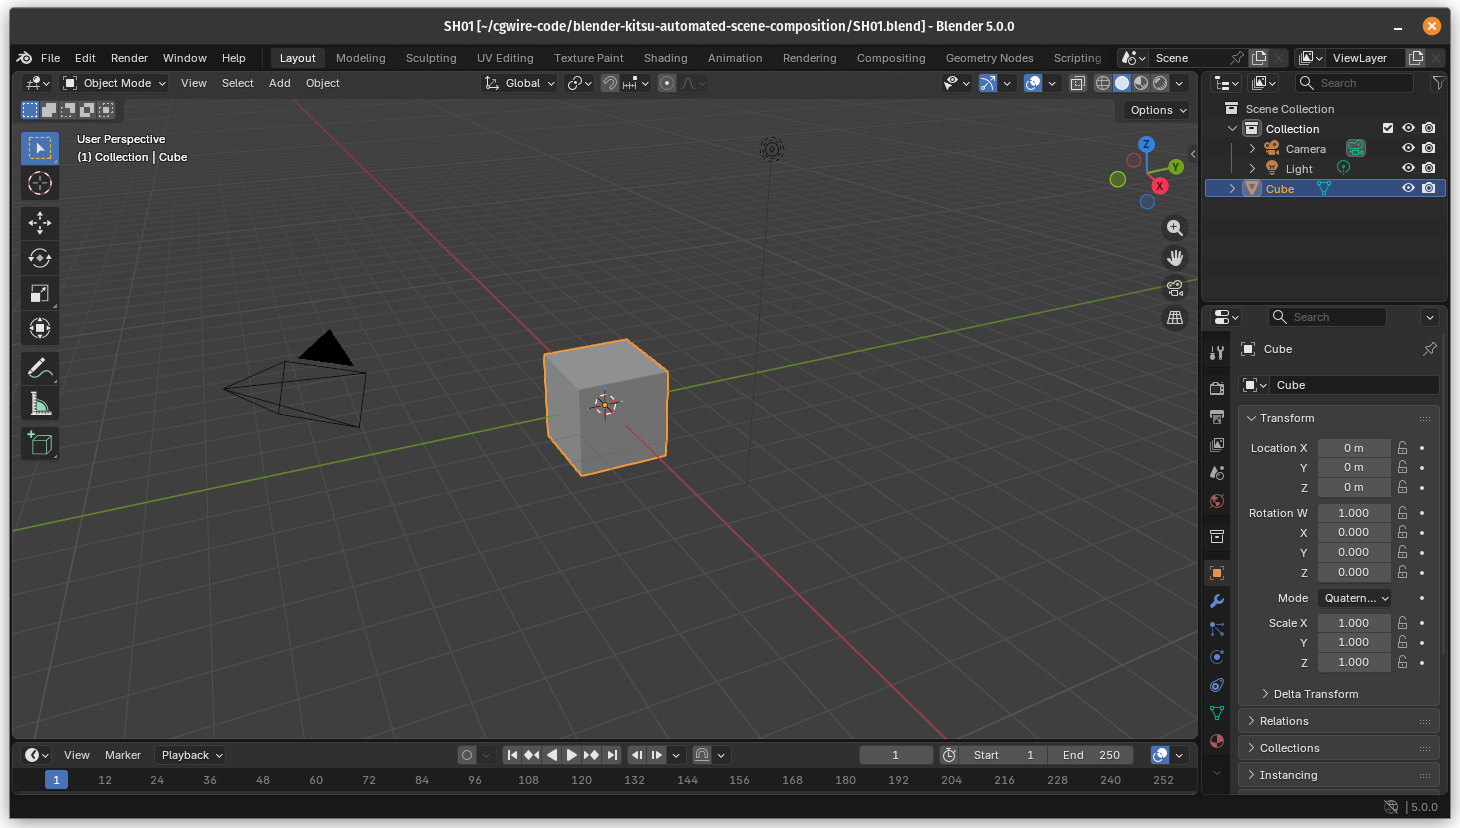
Before we import our Kitsu assets, we must eliminate any default objects that come with a new Blender scene. For this simple tutorial, we're targeting the default Cube, which is often the only object present besides the default Camera and Light:
bpy.data.objects.remove(bpy.data.objects.get("Cube"), do_unlink=True)
The do_unlink=True flag tells Blender to fully delete the object's data block (like its mesh data) if it’s no longer used by any other object to leave no clutter behind.
We are now ready for the imported assets to take their places.
4. Importing Asset Files
Now for the payoff! Since the file we downloaded from Kitsu is a standardised interchange .glb format, which handles both geometry and basic materials, we use Blender’s dedicated gltf import operator.
The crucial part is providing the correct absolute file path (glb_path) to the downloaded asset. Fortunately, we stored those in the previous code snippet:
for path in local_paths:
    if path.lower().endswith((".glb")):
        print(f"Importing: {path}")
        bpy.ops.import_scene.gltf(filepath=path)

print("All preview GLB files imported successfully!")
Once bpy.ops.import_scene.gltf() executes, Blender reads the file and automatically creates the corresponding objects, meshes, and materials in the current scene.
The imported asset is now a full-fledged Blender object, placed at the world origin (0, 0, 0), ready for subsequent pipeline steps.
5. Saving the Scene
The final step in this pipeline segment is to save the assembled layout into a permanent, versionable file. If you close Blender without this step, all the automated work is lost, so we use the bpy.ops.wm.save_as_mainfile operator. This is the programmatic equivalent of clicking File \> Save As in the Blender interface:
scene_save_dir = "./"
os.makedirs(scene_save_dir, exist_ok=True)

blend_filename = "SH01.blend"
blend_path = os.path.join(scene_save_dir, blend_filename)

bpy.ops.wm.save_as_mainfile(filepath=blend_path)
The result is a new Blender file, SH01.blend, that perfectly reflects the breakdown requirements from Kitsu, ready for the next department to pick up.
6. User-Friendly Addon
The script works as expected, but what about artists? Not everyone knows how to run a script.
Let's slightly modify our code to turn it into a Blender addon:
bl_info = {
    "name": "Kitsu Shot Auto-Importer",
    "description": "Pick a project and shot and auto-import the latest preview assets",
    "author": "cgwire",
    "version": (1, 0, 0),
    "blender": (3, 0, 0),
    "location": "Viewport > N-Panel > Kitsu",
    "category": "Import-Export",
}

import os
import sys

sys.path.append("~/.local/lib/python3.11/site-packages")

import bpy
import gazu
from bpy.props import EnumProperty, StringProperty

def get_projects():
    try:
        projects = gazu.project.all_projects()
        return [(p["id"], p["name"], "") for p in projects]
    except:
        return []

def get_sequences(project_id):
    if not project_id:
        return []
    try:
        seqs = gazu.shot.all_sequences_for_project(project_id)
        return [(s["id"], s["name"], "") for s in seqs]
    except:
        return []

def get_shots(sequence_id):
    if not sequence_id:
        return []
    try:
        shots = gazu.shot.all_shots_for_sequence(sequence_id)
        return [(s["id"], s["name"], "") for s in shots]
    except:
        return []

class KITSU_Props(bpy.types.PropertyGroup):
    project: EnumProperty(name="Project", items=lambda self, context: get_projects())

    sequence: EnumProperty(
        name="Sequence", items=lambda self, context: get_sequences(self.project)
    )

    shot: EnumProperty(
        name="Shot", items=lambda self, context: get_shots(self.sequence)
    )

class KITSU_OT_import_shot(bpy.types.Operator):
    bl_idname = "kitsu.import_shot_assets"
    bl_label = "Import Shot Assets"
    bl_description = (
        "Download and import latest preview GLB/GLTF files for selected shot"
    )

    def execute(self, context):
        props = context.scene.kitsu_props

        # Fetch shot data
        shot = gazu.shot.get_shot(props.shot)
        assets = gazu.casting.get_shot_casting(shot)

        download_dir = os.path.join(bpy.app.tempdir, "kitsu_previews")
        os.makedirs(download_dir, exist_ok=True)

        local_paths = []

        for asset in assets:
            tasks = gazu.task.all_tasks_for_asset(asset["asset_id"])
            if not tasks:
                continue

            last_task = max(tasks, key=lambda x: x["updated_at"])
            preview_files = gazu.files.get_all_preview_files_for_task(last_task)
            if not preview_files:
                continue

            last_preview = max(preview_files, key=lambda x: x["updated_at"])

            save_path = os.path.join(
                download_dir,
                last_preview["original_name"] + "." + last_preview["extension"],
            )

            gazu.files.download_preview_file(last_preview, save_path)
            local_paths.append(save_path)

        # Clean default cube
        obj = bpy.data.objects.get("Cube")
        if obj:
            bpy.data.objects.remove(obj, do_unlink=True)

        # Import GLB/GLTF assets
        for path in local_paths:
            if path.lower().endswith((".glb", ".gltf")):
                bpy.ops.import_scene.gltf(filepath=path)

        # Auto-save blend file
        save_dir = os.path.join(os.path.expanduser("~"), "kitsu_scenes")
        os.makedirs(save_dir, exist_ok=True)

        blend_path = os.path.join(save_dir, f"{shot['name']}.blend")
        bpy.ops.wm.save_as_mainfile(filepath=blend_path)

        self.report({"INFO"}, f"Imported assets and saved: {blend_path}")
        return {"FINISHED"}

class KITSU_PT_panel(bpy.types.Panel):
    bl_label = "Kitsu Auto-Importer"
    bl_idname = "KITSU_PT_auto_importer"
    bl_space_type = "VIEW_3D"
    bl_region_type = "UI"
    bl_category = "Kitsu"

    def draw(self, context):
        props = context.scene.kitsu_props
        layout = self.layout

        layout.separator()
        layout.prop(props, "project")
        layout.prop(props, "sequence")
        layout.prop(props, "shot")

        layout.separator()
        layout.operator("kitsu.import_shot_assets", icon="IMPORT")

classes = (
    KITSU_Props,
    KITSU_OT_import_shot,
    KITSU_PT_panel,
)

def register():
    for c in classes:
        bpy.utils.register_class(c)
    bpy.types.Scene.kitsu_props = bpy.props.PointerProperty(type=KITSU_Props)

def unregister():
    for c in classes:
        bpy.utils.unregister_class(c)
    del bpy.types.Scene.kitsu_props

if __name__ == "__main__":
    register()
We can now manually pick a production, sequence, and shot to get breakdown data from, and import the corresponding casting in the current Blender viewport:
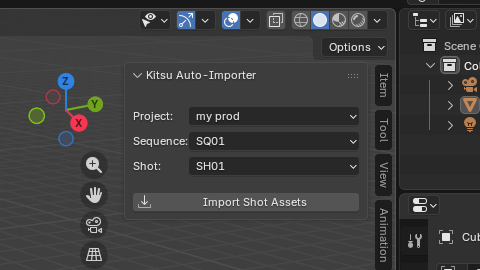
The logic is simple: we use the same gazu code to populate dropdown menus, and we encapsulate them all in a panel in the viewport. An import button downloads all the corresponding breakdown assets and imports them into the current workspace.
Keep in mind that adding sys.path.append("~/.local/lib/python3.11/site-packages") lets Blender use your system’s Python installation to load external libraries like gazu. Since Blender ships with its own isolated Python environment, managing package installations can be inconvenient. By extending the path, you simply instruct Blender to check your local modules as well. Make sure to adjust this path to match your own setup.
Conclusion
By pulling breakdown lists directly from Kitsu and scripting Blender to assemble scenes, you eliminate repetitive manual steps and ensure asset consistency across all shots. This approach doesn't just save time but also reduces human error and ensures every artist starts with the correct asset version and scene setup required by the producer. This way, you can easily handle ten shots or ten thousand with equal reliability.
But don't take our word for it, clone the Github repository to try out the result!
You can extend this workflow by generating automated previews, reports, or even updating asset information from the new revisions created during the shot animation.