An animation project takes months to produce and thus requires careful planning to deliver successfully: storyboarding is the first step to bring a script to life with visual representations that will influence the rest of the production.
With Kitsu, we at CGWire have witnessed firsthand how important storyboarding is to help animation studios to come up with creative visions in collaborative, international environments.
In this article, we offer a dive into the process of storyboarding―its purpose in the animation pipeline, techniques, best practices, and process steps. Whether you’re a seasoned animator, an aspiring storyteller, or simply want to peek behind the scenes, you’ll find something to hone your storyboarding skills. Welcome aboard!
What’s Storyboarding
Storyboarding is the process of creating a sequence of images that visually represent the story scene by scene, based on a design pack containing the script, pre-story designs, and a breakdown of all the assets in each episode before the actual production begins.
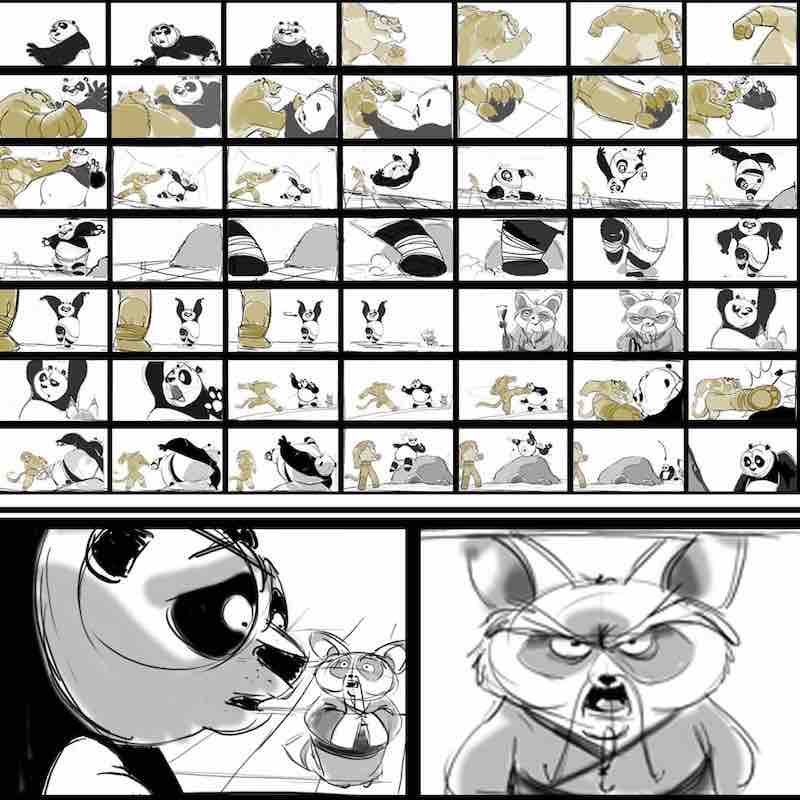
While there is no standard format to follow, storyboards usually include panels, camera angles, and sometimes dialogues and annotations. The result is not unlike a comic book: a rough drawing with enough details to guide future work. For example, here is a storyboard for Kung Fu Panda:

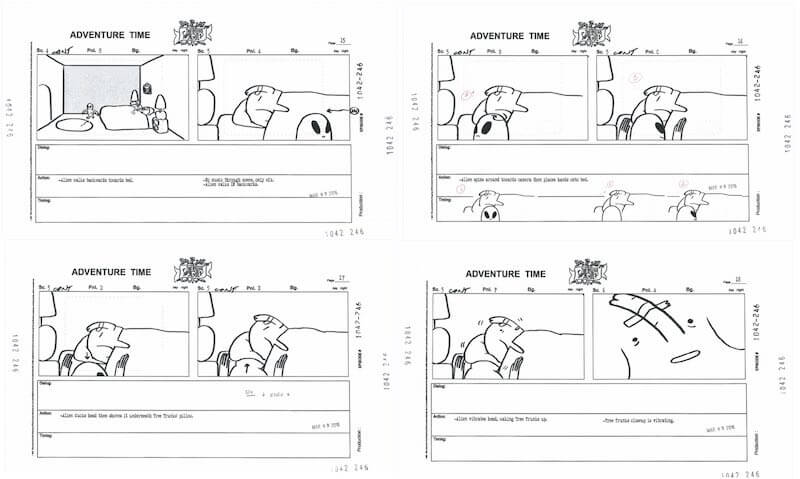
Or another with more detailed annotations from Adventure Time:

Why Storyboarding
A storyboard shows the progression of a story, allowing creators to visualize it shot by shot before any actual animation work begins to shape the narrative flow, establish key scenes, and evaluate the composition and pacing of each shot.
Because storyboarding helps identify potential issues early on, it saves valuable time and resources during the pre-production and production phases. It also provides a clear roadmap for the animation team to follow, serving as a visual reference that guides animators and ensures consistent designs.
The storyboard is where the animation team collaboration efforts start. By establishing the visual language and desired aesthetics early on, storyboards act as a reference point for maintaining the intended artistic direction. They enable the team to align their efforts and produce a cohesive and visually pleasing animation that aligns with the project's goals and objectives.
Who Does Storyboarding
Storyboarding is teamwork.
During pre-production, the director oversees the creative vision of the project and guides the storyboard process. They work closely with the storyboard artists to ensure that the story and visuals align with their vision. Storyboard artists are responsible for translating the script produced by the scriptwriters into panels. An art director can be involved to come up with a unique aesthetic for the animation.
During the later stages of pre-production and production, animators use storyboards as a reference to bring the characters and scenes to life through movement. They rely on the storyboard's composition and key poses to guide their animation work. Layout artists create detailed layouts that determine the placement of characters, props, and backgrounds within each scene. They establish the spatial relationships and camera setups based on the storyboard's compositions.
Additionally, various members of the production team like producers, coordinators, and supervisors, are also usually involved in the storyboard process to provide support, manage schedules, and ensure the project progresses smoothly. The supervisor board makes sure each different storyboard artist adopts the same art style to add consistency.
The Storyboarding Process
A storyboard artist doesn’t start from scratch. The early stages of pre-production deliver precious input:
- Scripting - The script outlines the story, characters, and key plot points of an episode or film. It’s validated by the different co-producers, making sure the text respects the production constraints to stay on time and on budget.
- Script Breakdown - A breakdown is a list of all the assets present in an episode― character, background, props.
- Pre-story designs - The artists draw all the assets needed for each episode.
- Voices & Design pack - The production assistant gathers all the elements of an episode (script, voice assets, designs), as well as a brief from the director and the lead storyboard including a story outline and annotations that give a high-level overview of the narrative structure and main events, in a single package.
Storyboarding then turns the design pack into the storyboard:
- Thumbnail sketches - Thumbnail sketches are rough, small-scale drawings that capture the key moments and compositions of each scene. They serve as a quick visual exploration and help in planning the storyboard of a scenario.
- Shot breakdown - Based on the script and thumbnail sketches, the shots are broken down scene by scene, determining the camera angles, character positions, and important visual elements for each shot.
- Panel creation - Each storyboard panel represents a specific shot or moment in the story and includes characters, backgrounds, dialogue, and action notes.
- Animatic - An animatic is a video of the storyboard panels of a given scene, synced to temporary sound and music. It gives the director and team an idea of the pacing and timing of the story and can help identify any issues that need to be addressed before moving on to the animation phase. This is sometimes the storyboard artist’s job, but storyboard editors are traditionally responsible for creating animatics.
At this point, the storyboard is validated by reviewing each panel and the corresponding action notes and dialogues. It is then used throughout the rest of the production. The production assistant lists all the new elements from the storyboard that have yet to be created and passes it on to the 3D modelers and animators. During production, the storyboard guides how assets are modeled, composed together, and animated. And during post-production, it can also be used as a reference for editing and audio mixing.
The storyboarding process is iterative and involves collaboration and feedback and validation loops between various stakeholders.
Storyboarding Best Practices
Whether you missed a scene or lacked details in a panel, a mistake during the storyboarding process will cause significant production delays. You can implement the following best practices to create better storyboards while increasing the processing speed:
- Maintain visual consistency - Make sure to pay attention to the design pack to keep a coherent style and make collaboration easier.
- Pace it - Consider the pacing of each scene to create an engaging flow, using panels and notes to indicate the desired duration and pacing of your sequences.
- Keep it simple - Capture the essence of each scene without getting overly detailed. Storyboards are meant to be a visual guide that are clear and easy to read, so avoid excessive details that may slow down the process.
- Show, don’t tell - While action notes shouldn’t be neglected, don’t forget to leverage visual storytelling. The storyboard artist should have a clear understanding of the story, characters, and setting before beginning the storyboarding process, so that these elements can be effectively integrated in the scenes with subtle camera or character movements.
- Focus on movement - Animation is all about movement, so make sure to emphasize character movement, camera movement, and emotions in the storyboard. Aim for a diverse range of shots, including wide shots, close-ups, and dynamic angles, to enhance storytelling.
- Include visual references - Use reference material like pictures, audio, or video, to help capture the look and feel of the scene accurately.
- Don’t overcut the shots - The more frames you add, the faster the rhythm feels. Inversely, fewer frames create a sense of slowness. Make sure to be aware of how the scene should feel and cut the shots accordingly.
- Leverage animation key poses - An animation key pose is a frame capturing essential movements in a sequence, assisting animators in determining the various elements to be animated with distinct frames and timings.
Because storyboarding is a collaborative task, it’s also important to use the right digital tools to streamline the process and facilitate revisions. A tool like Kitsu saves precious time by providing a central repository to store all your storyboard assets:
- Get everyone involved - Involve relevant stakeholders―such as directors, animators, and production designers―in the review process: seek their feedback to ensure the storyboards align with the overall vision and address any potential issues or challenges early on.
- Write it down - Always include clear annotations, camera movements, and action notes alongside the drawings. These annotations provide additional context and technical instructions for the animation teams.
- Save it and keep it organized - Maintain a well-organized file structure for your storyboards, ensuring easy access and version control. Label and categorize panels, scenes, or sequences to locate specific sections quickly, making it easier to manage and update the storyboard.
Conclusion
Storyboarding is a pillar of animation production, providing a visual roadmap that brings stories to life and facilitates team collaboration by identifying potential issues and ensuring consistency with the creative vision. It isn’t uncommon for storyboards to be considered unique art pieces that sell for hundreds of thousands of dollars, so make sure to take good care of your storyboards!
As you embark on your animation journey, harnessing the power of CGWire's Kitsu improves your storyboarding process. With Kitsu's robust features for asset management, collaboration, and review, you can effortlessly manage your storyboard assets throughout the animation pipeline. From organizing versions to facilitating real-time collaboration among team members, Kitsu empowers you to bring your vision to fruition while maintaining efficiency and creative control. Sign up to Kitsu today and witness the impact on your animation projects!


